Clone a New Website
A) Login to the myrealty website network and make sure the NS Cloner plugin is network activated by clicking here. If it’s not activated, activate it.
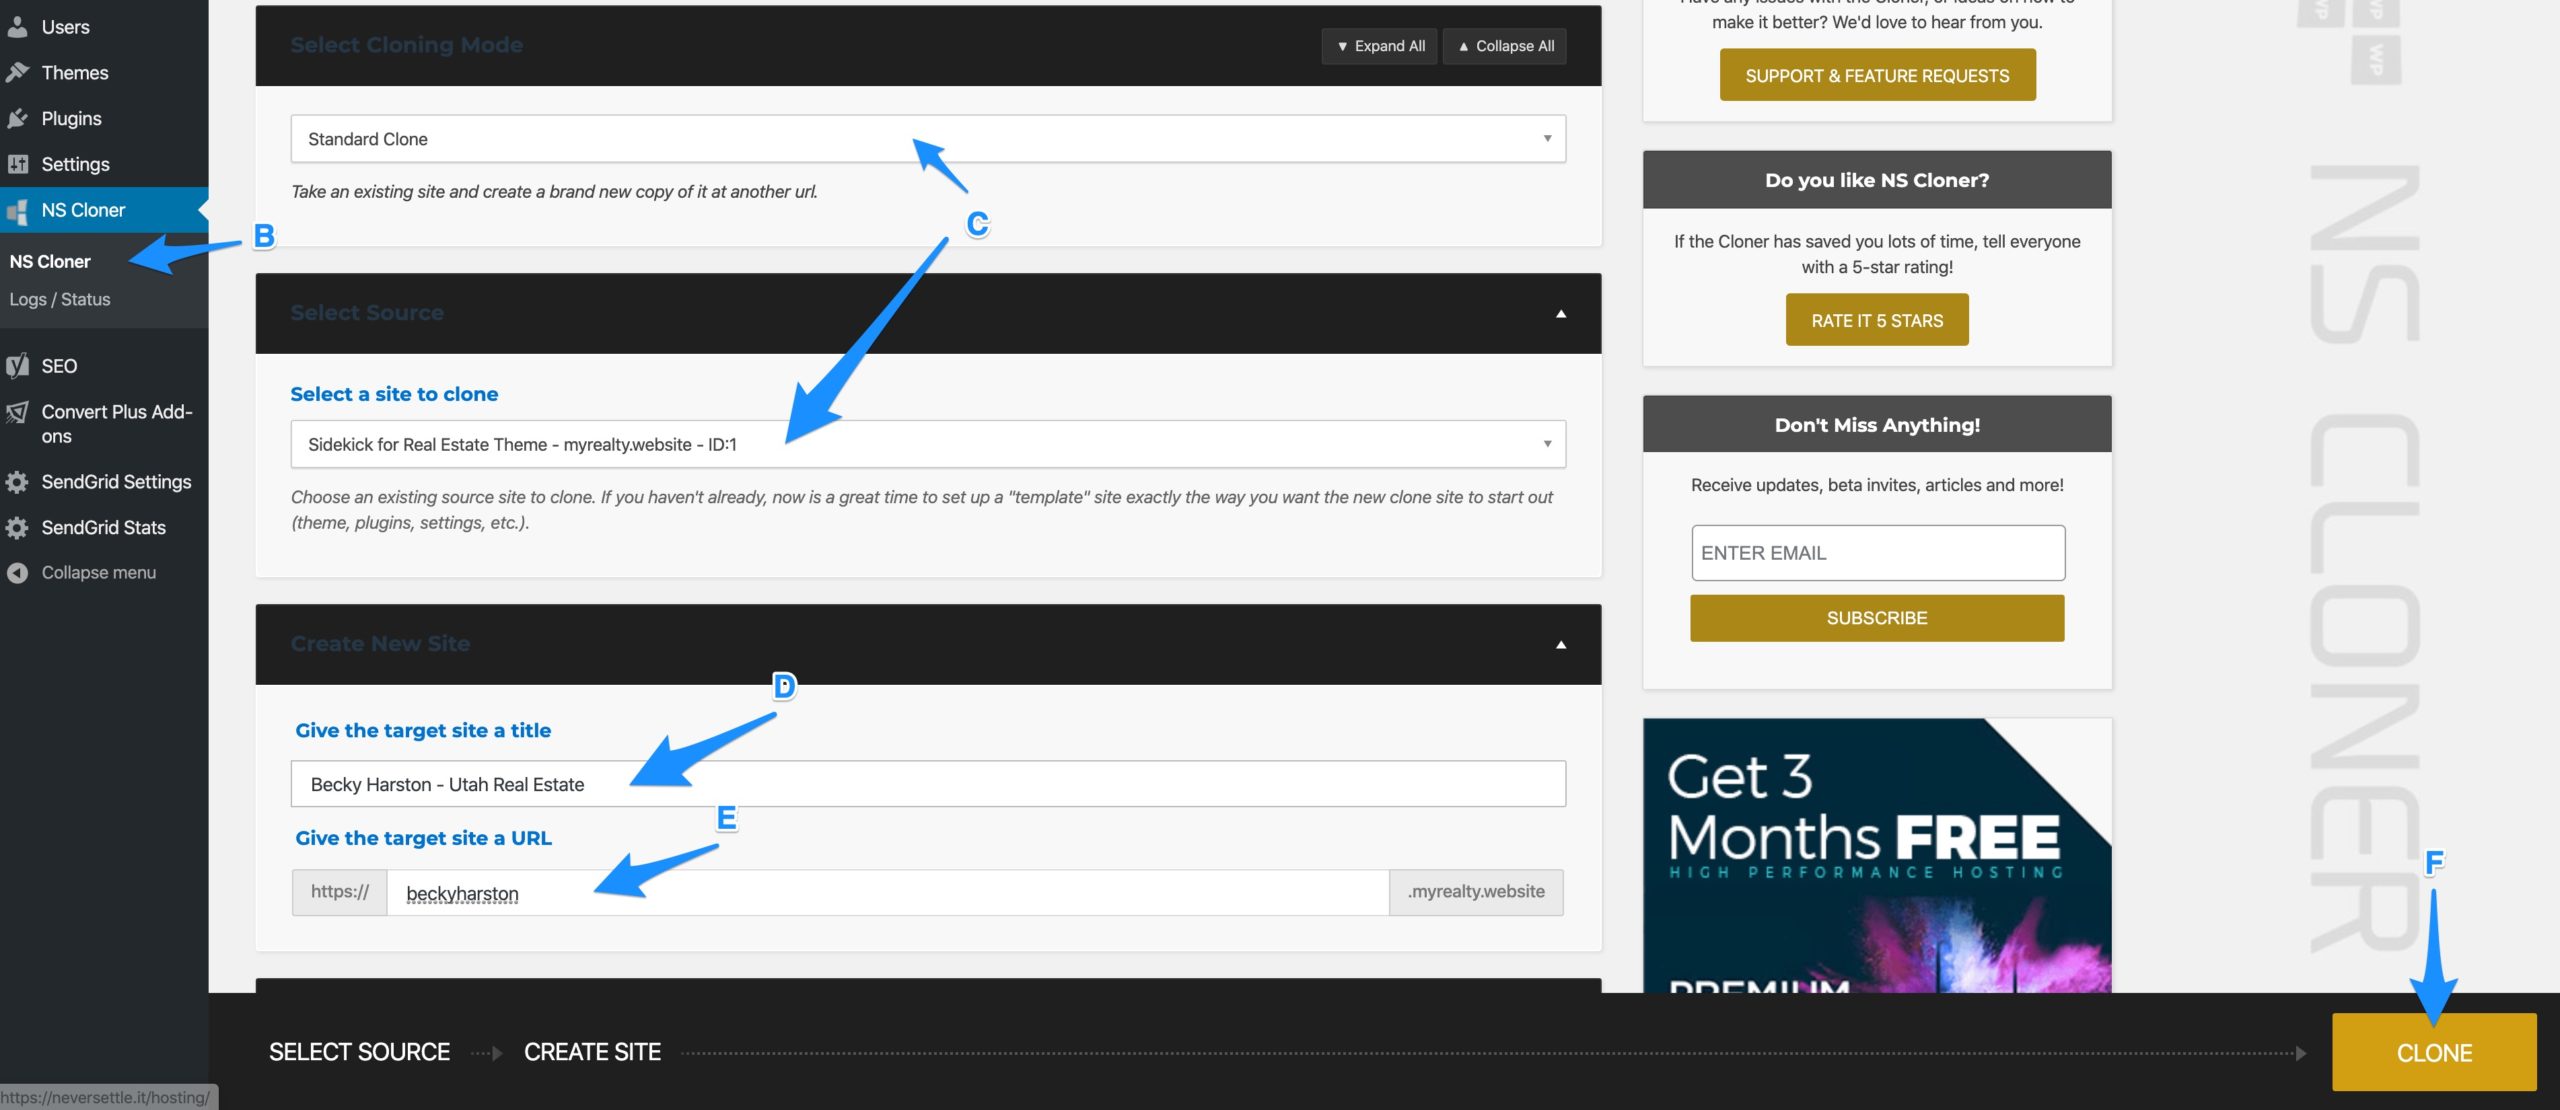
B) Click on NS Cloner on the left
C) Choose “Standard Clone”. Choose the website that corresponds to the client’s market
- If the client’s market is Cobb GA, choose cobbga.myrealty.website as the source
- If the client’s market is Orange County, choose orangecounty.myrealty.website as the source
- If the client’s market is Portland, choose portland.myrealty.website as the source
- If the client’s market is Salt Lake City, choose saltlakecity.myrealty.website as the source
- If the client’s market is Vancouver, choose vancouver.myrealty.website as the source
D) Enter the site title, which is the client’s “Account Name” field in Airtable
E) Enter a URL which is also the client’s “Account Name” field in Airtable, all lowercase, one word
F) Click “Clone”
Add Subdomain to SpinupWP
A) Login to https://spinupwp.app/dashboard
B) Click on the “myrealty.website” server, then the “myrealty.website” site.
C) Under “Additional Domains” scroll down and click “+ Add Domain”
D) Enter the domain name you just created.
E) Click Save.
F) Wait for the server to deploy the changes before moving forward.

NOTES:
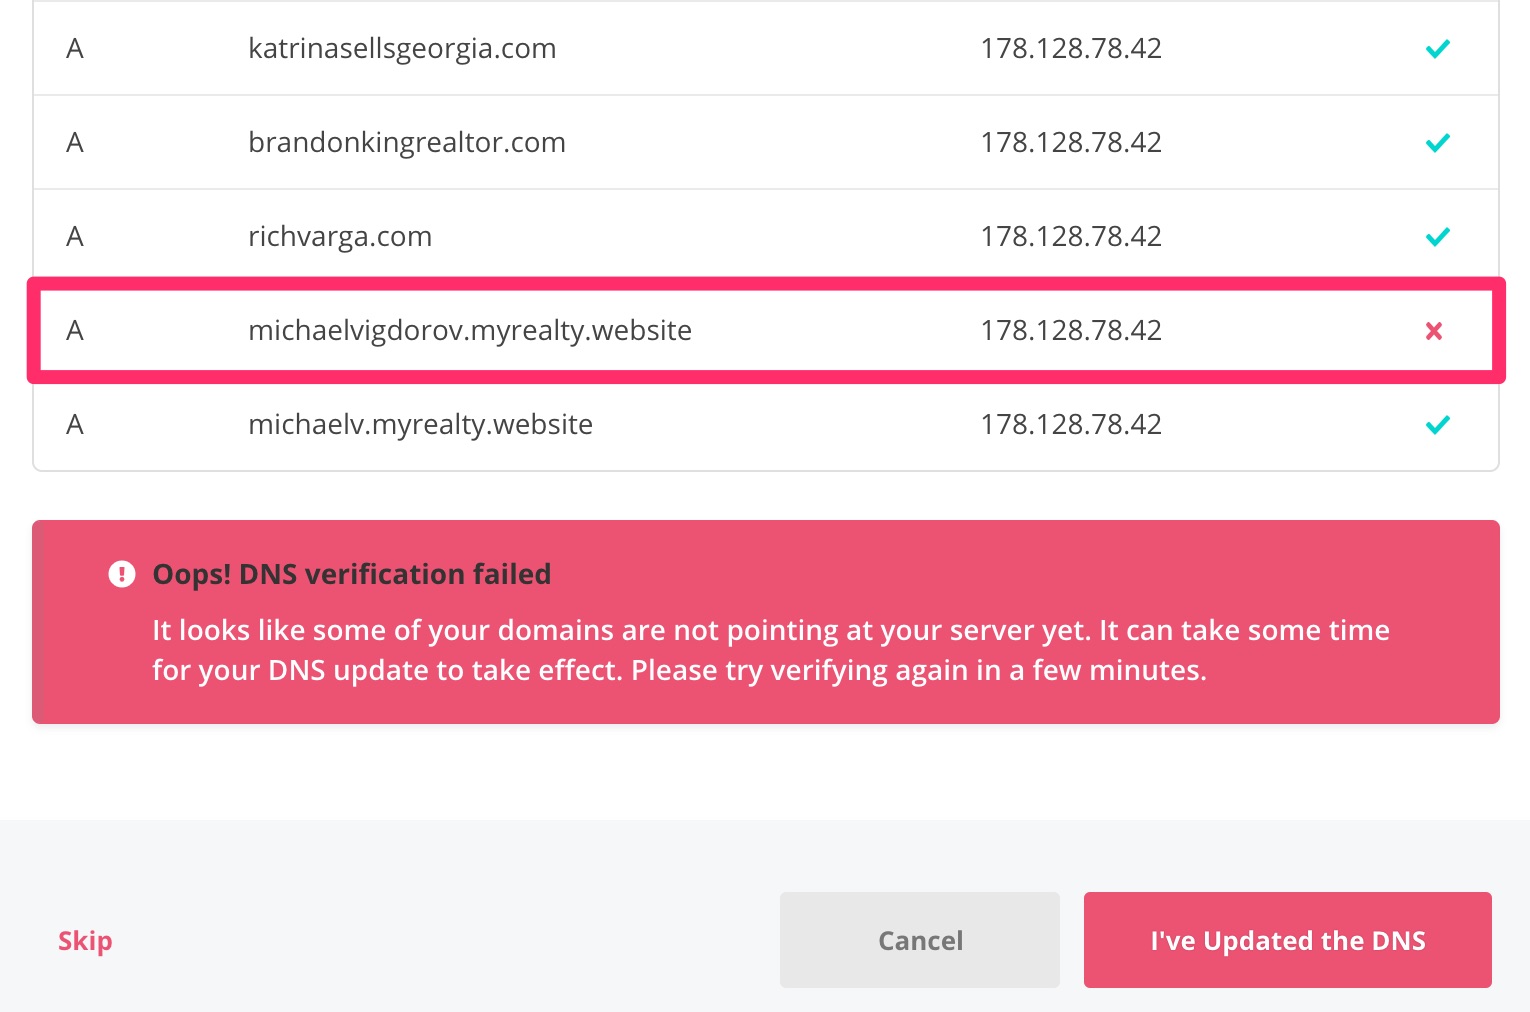
- The “Save” button will be greyed out and will say “Deploying Changes…” while it’s deploying changes. In the top right corner, the gears will be moving with a blue badge.

- Watch the blue badge. If it turns into a red X, please let Cody know before proceeding.
- If you receive a popup error like the screenshot below with message that says, “Oops, DNS verification failed”, please let Cody know before proceeding.
Add Customer User
A) Back in the myrealty network, go to the sites list, hover over the website you just created and click “Dashboard”
B) Go to Users > Add New
C) Under “Add New User”, enter the following:
- A username using the client’s first and last name with no spaces or capitalization
- The client’s email address
- Choose Role > Administrator
- Check the box to skip the confirmation email
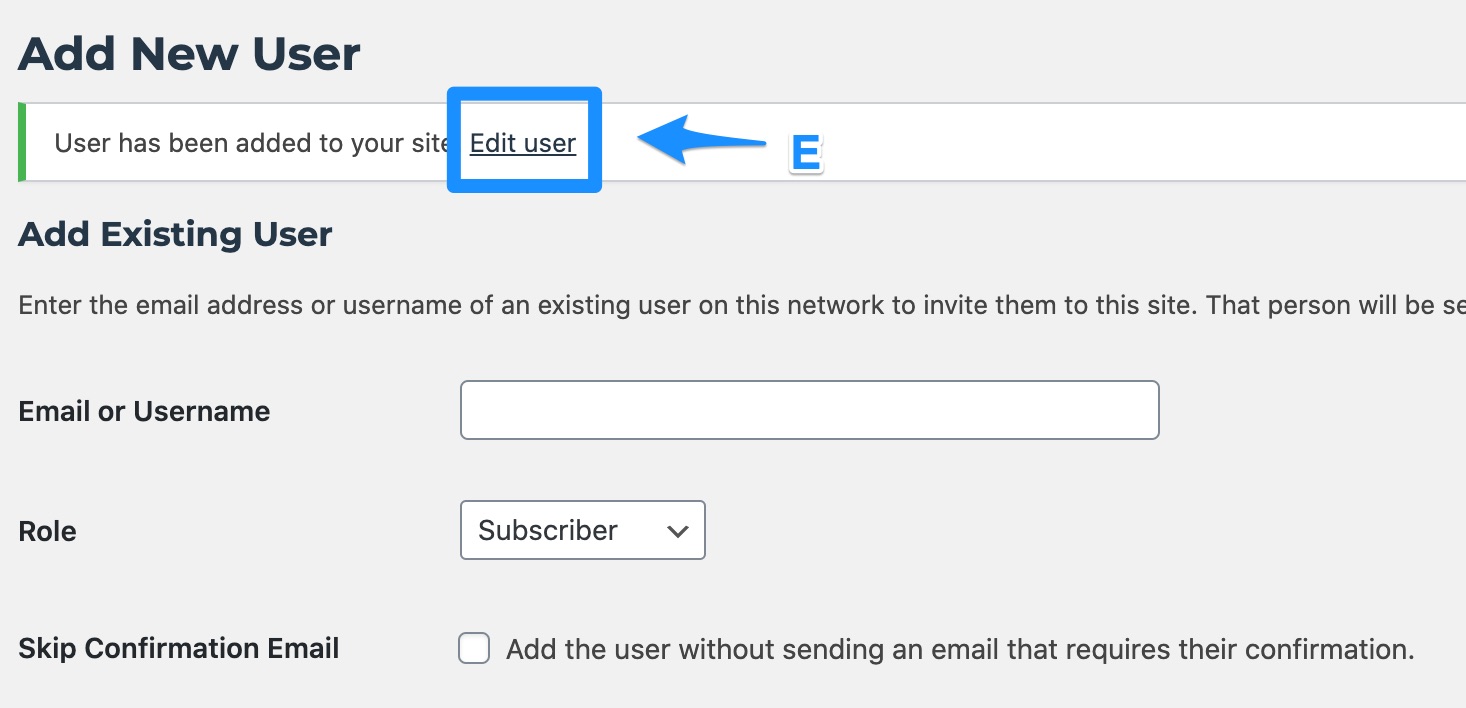
D) Click “Add New User”
E) Once the user has been created, a confirmation message will display at the top of the page. Click the “Edit user” link in the confirmation message.
F) Enter the client’s first and last name into the appropriate fields
G) Choose the first and last name combination in “Display name publicly as”
H) Scroll down and click “Update User”
Back to TopAdd Site to Hub
A) Go to “Plugins” > “Installed Plugins”
B) Deactivate the “Luminary Agent Manager” plugin
C) Activate the “MainWP Child” plugin
D) Login to the hub and add a new site by clicking here
E) Enter the following information:
- Site URL: enter the new site’s URL you just created
- Administrator username: enter the username you just created
- Site title: should have automatically filled in but, if not, make same as “Site URL”
- Groups: select all the appropriate groups for the client.
- Looking in Airtable, if the client has the “04 – Social Media” product, add them to the “Illuminate Social – [Market]” group for their market
- Add them to the “Market – [Market]” group for their market
- If the client has the “02 – Blog” product, add them to the “Illuminate Blogs – [Market]” group for their market
- If the client has the “01 – Website” product, add them to the “Illuminate Website” group (this is not market specific)
- Branding: check the “Apply global Branding options” box
F) Click “Add Site”
Back to TopIgnore Updates
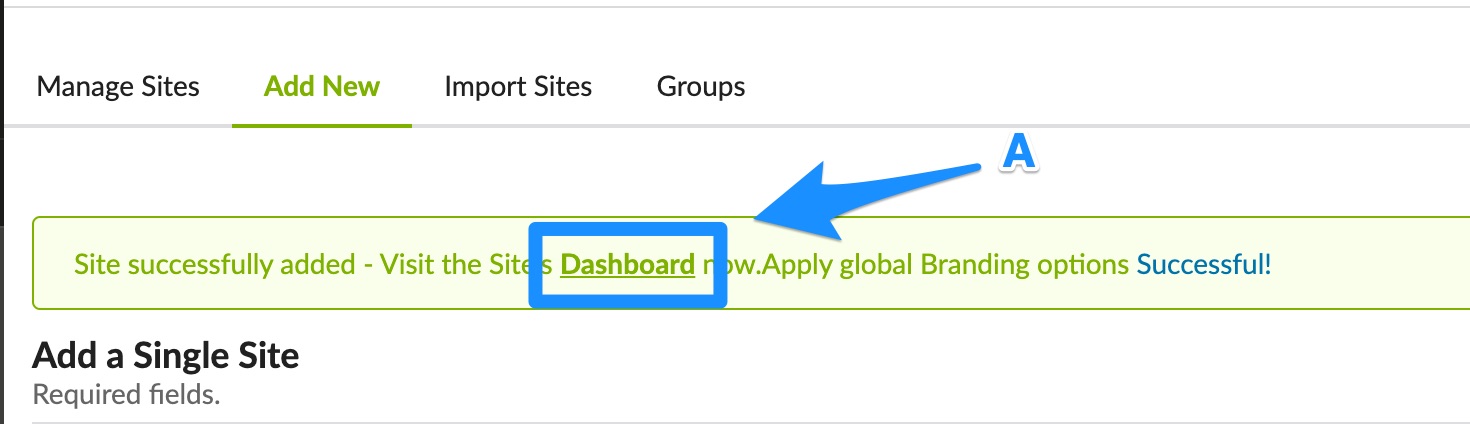
A) Once the site has been added, you’ll see a confirmation message at the top of the screen. Click “Dashboard” in the message.
B) Click “Edit” on the top next to “Overview”
C) Toggle “Ignore core updates”, “Ignore plugin updates”, and “Ignore theme updates” to the ON position
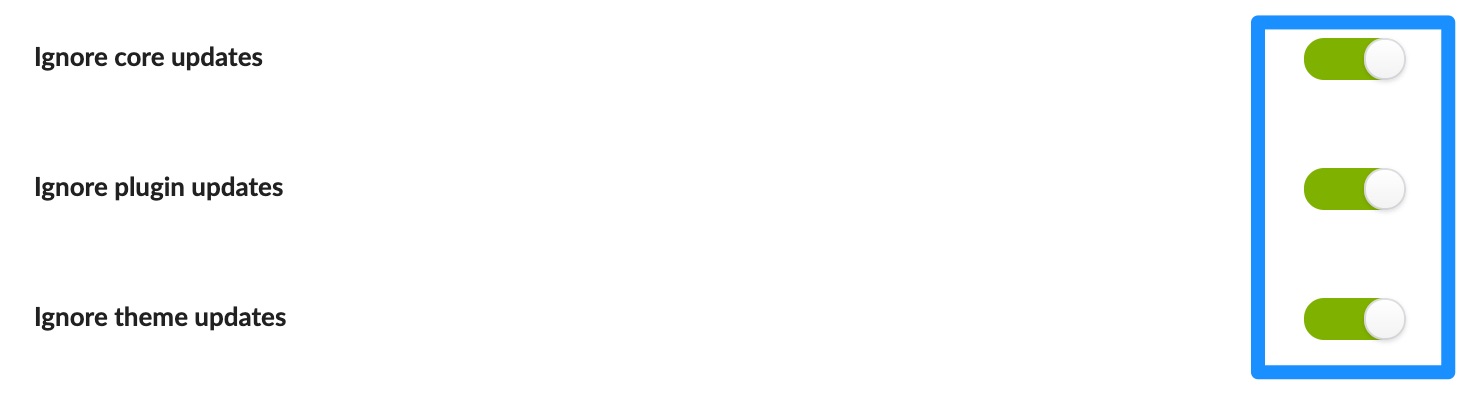
D) Scroll to the bottom and click “Save Settings”
Back to TopChange General Settings
A) Go to Settings > General.
B) Enter {Market} Real Estate for the tagline
C) Change the timezone to the client’s timezone. Note: You may need to look up the client’s address to verify their time zone if you are unsure.
D) Click “Save Changes”
Back to TopCustomize Template Details
A) From the website’s homepage, choose “Customize” in the Admin bar
B) Go through each section and enter the appropriate details below.
C) When you are finished with all updates, click “Publish”
Luminary Agent
- Logos – the client’s logos will be in their “Brand” folder.
- Upload the DUAL LOGO color version as the “Company Color Logo”.
- Upload the DUAL LOGO white version as the “Company White Logo”.
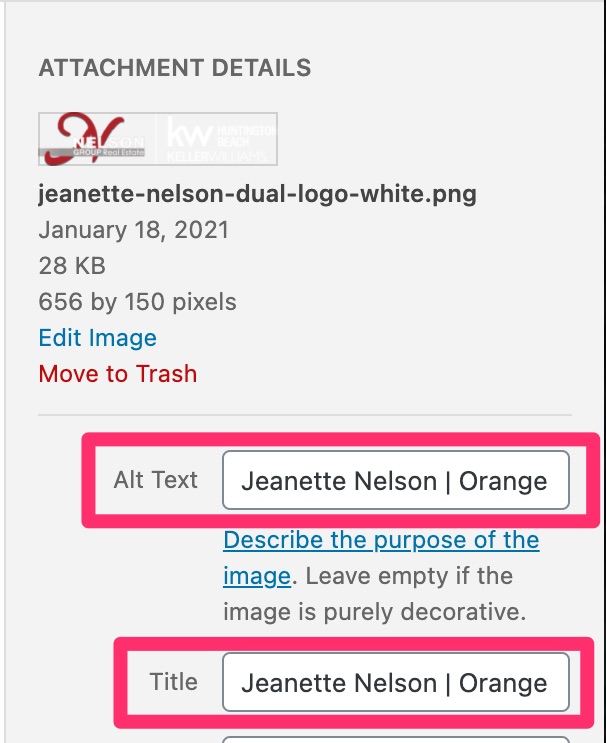
- When you upload the logos, change the “Alt Text” and “Title” to {Account Name} | {Market} Real Estate
- Fonts – you can leave these unless otherwise specified
- Brand Colors – looking at the Airtable view at this link, use the three hex codes found in the field “Company Web Colors” IN THE ORDER YOU SEE THEM.
- Display Options
- Industry – choose Real Estate
- Header – choose logo left unless instructions have been given otherwise
- Header background color – choose transparent unless instructions have been given otherwise
- Menu – choose Simple unless instructions have been given otherwise
- Footer – choose Map unless instructions have been given otherwise
- Display Blogroll on Home? – check this box IF the client has the “Blog” product attached to their Airtable record
- Display Locations Link in Header? – leave unchecked unless instructions have been given otherwise
- Upload or select a default featured image
- Sitewide Info – please get all of this information from this Airtable view or from the customer’s New Customer Info Sheet
- Company Name
- Street Address
- City, State, Zip
- Main Phone Number
- Email Address
- Sitewide Disclaimer
- Social Media Filename – check this Airtable view
- Social Media – Please enter the client’s social media URLs – check this Airtable view or from the customer’s New Customer Info Sheet
Menus
- For the Simple menu—use the “Primary Menu” menu position for this menu. Create a new menu called “Primary Menu” and add all of the pages you want to in the menu.
- For the Complex menu—you can use up to six menu positions and should use a minimum of three.
- The first menu position should be for the “Purchase” or “Buy” menu.
- The second menu position should be for the “Refinance” or “Sell” menu.
- The third menu position should be for the “About” menu.
- If the site is for an individual, change “Contact Us” to “Contact” and “About Us” to “About Me.”
Customize the Homepage
The homepage information is in a Google doc in the customer’s “Websites” folder.
A) From the website’s home page, click “Edit Page” in the Admin bar
Homepage Feature Area
B) Click on the Homepage Feature Area block
C) Using the information in the Google Doc, fill in the content
D) Click to expand the “Home Feature Buttons” block section and change the button colors to the third color option (the Call to Action color)
Image and Content Block
E) Click on the “Image and Content” block
F) Click on the “Content” block section
G) Delete the placeholder image, heading, content, and button text
H) For the image, upload the client’s 3×2 image that’s saved in their Websites folder
NOTE: when you upload the image, make sure you change the Alt Text and the Title to match this format: {Account Name} | {Market} Real Estate
For example: if the client is Cody Martens, it would be Cody Martens | Portland Real Estate
I) For the heading, content, button link, and button text, use the information in the Google doc to create the content
J) Make sure you also change the button color to the third color option (the Call to Action color)
Boxes (If Present)
K) Click on the “Boxes” block
L) Change the button color for each of the three boxes, choosing color 1 for box 1, color 2 for box 2, and color 3 for box 3
Call to Action
M) Click on the Call to Action block
N) Click to expand the “Background” block section and change the background color to the second color (the client’s Color 2)
O) Click to expand the “Content” block section and replace the dummy heading and content with the content in the Google doc
P) Click to expand the “Buttons” block section and replace the dummy button text
Q) Change the Button Color to the third color option (the client’s Call to Action color)
R) Click Update
Back to TopChange Post Author
A) Go to Posts > All Posts.
B) Select all posts.
C) Choose Bulk Actions > Edit.
D) Click Apply.
E) In the “Author” dropdown, choose the client’s name.
F) Click Update.
Back to TopChange Page Author
A) Go to Pages > All Pages.
B) Select all posts.
C) Choose Bulk Actions > Edit.
D) Click Apply.
E) In the “Author” dropdown, choose the client’s name.
F) Click Update.
Back to TopChange Contact Page Title/Text
If the client is a company or team, you can simply complete this step with no action. If the client is an individual, change “We” in the heading to “I”.
Old Heading
We want to hear from you!
New Heading:
I want to hear from you!
Back to TopEdit Form Notifications
A) Go to Forms > Forms
B) Hover over the “Contact Us” form, hover over “Settings”, and click “Notifications”
C) Hover over “Admin Notification” and click “Edit”
D) Update the following fields:
- Send to Email: enter the client’s email
- From name: enter the client’s domain name
E) Click “Update Notification”
F) Repeat for all forms
Back to TopCreate RECAPTCHA Account
A) Go to Google Recaptcha by clicking here
B) Click “Admin Console”
C) Make sure you’re logged in with the [email protected] account
D) Click the “+” button
E) Enter the following information:
- Label: enter the client’s LIVE domain name
- reCAPTCHA type: V3
- Domains: enter the client’s LIVE domain as well as the STAGING domain you created
- Owners: add the client’s email address. If you receive an error that it isn’t a valid Google email, email and/or text the client and ask for an email associated with a Google account.
F) Back in the client’s website, go to Forms > Settings
G) Copy the Site Key and Secret Key into the V3 fields and click “Save Settings”
Back to TopCreate Employee(s)
Employee contact information should be in the customer’s “New Customer Info Sheet” in their Google Drive folder. Employee bios should be in the customer’s “Files” folder. Formatted employee photos should be in the customer’s “Agent Photos” folder.
For each member of the team, do the following:
A) In the client’s dashboard, hover over “Employees” and click “Add New”
B) Insert the employee’s name for the page title
C) Insert the employee’s bio in the block editor
D) Fill out the employee’s contact info in the “Employee Information” tab
E) Fill out the employee’s social media URLs in the “Social Media Accounts” tab
F) Insert the employee’s “photo-square” photo from their Websites folder for the featured image
If the client is an individual (there are no other team members), then also do the following:
G) In the client’s dashboard, hover over “Appearance” and click on “Menus”
H) Select the “Main Menu” from the dropdown (if it isn’t already selected) and click “Select”

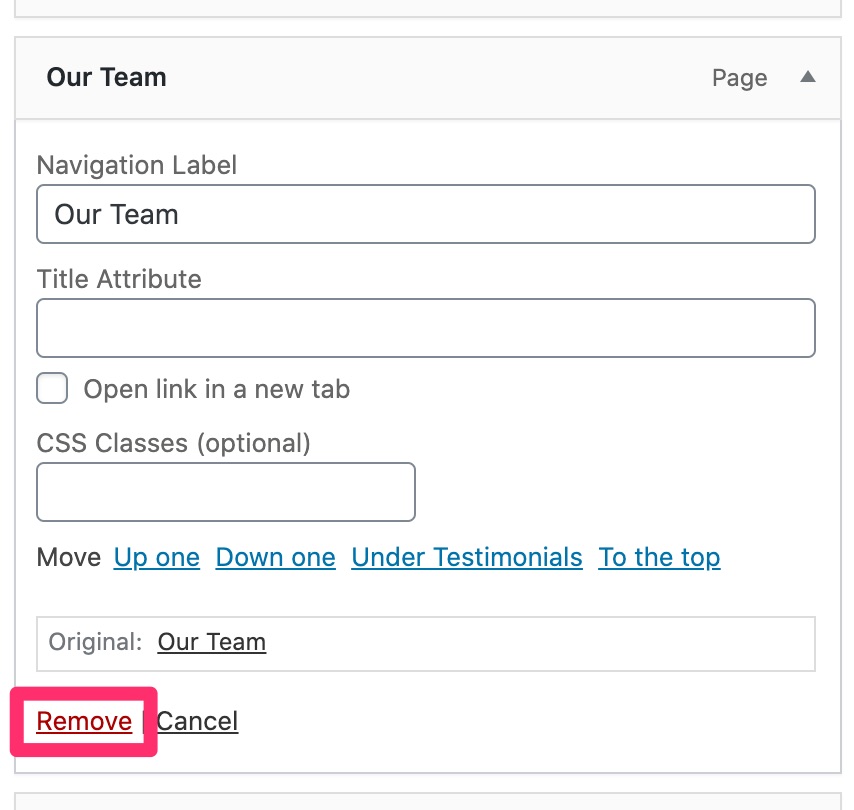
I) Expand the “Our Team” page link and click “Remove”
J) Expand the “Employees” menu options, select the client’s employee post, and click “Add to Menu”
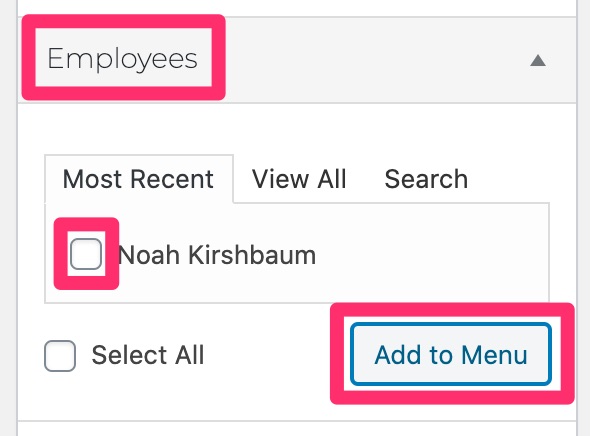
NOTE: if you don’t see the “Employees” accordion section, click on Screen Options in the top-right and check the box next to “Employees”

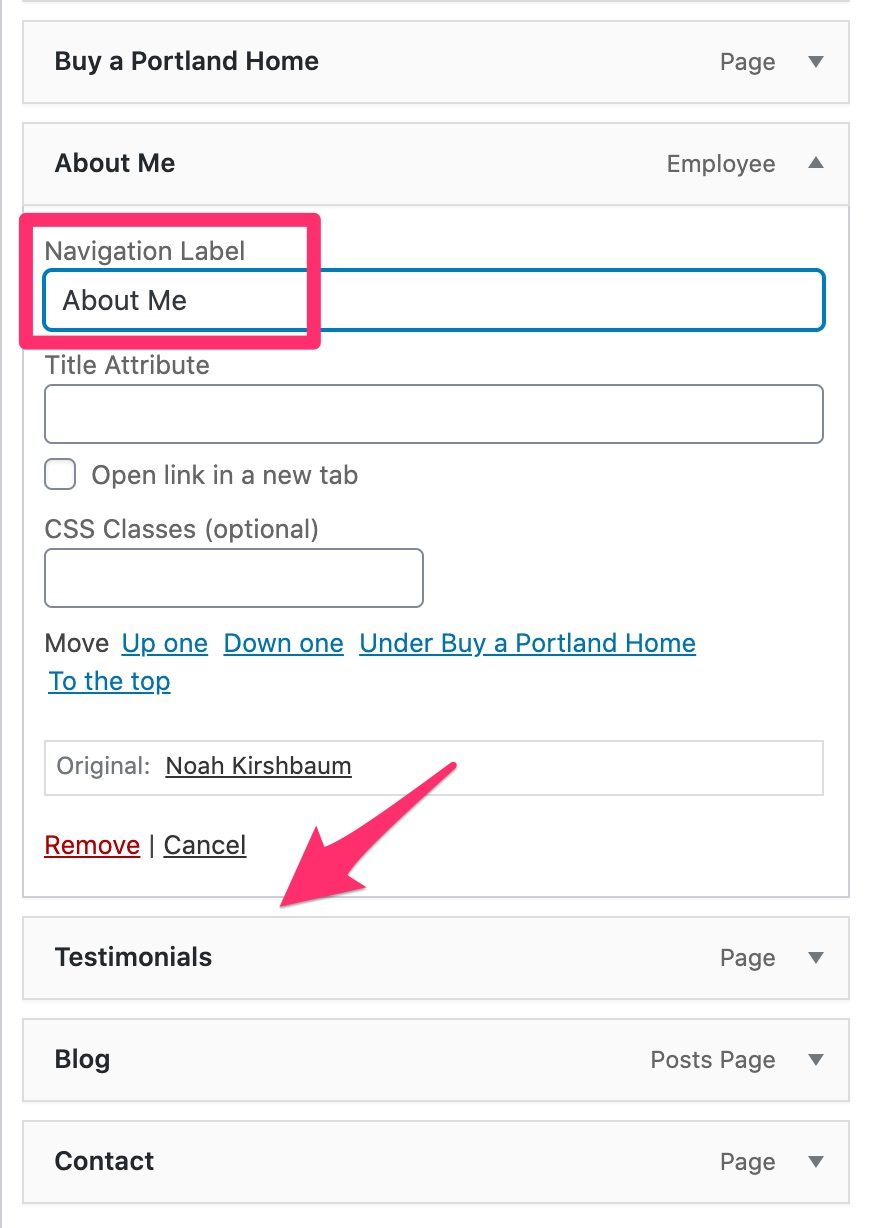
K) Drag the new menu item above “Testimonials”, expand it, and change the “Navigation Label” to “About Me”
L) Click “Save Menu”
Back to TopCreate/Import Reviews
If the customer gave us review links in the New Customer Info Sheet, follow this procedure:
If the customer gave us reviews not located in the links above, for each review, do the following:
A) In the client’s dashboard, hover over “Testimonials” and click “Add New”
B) Add the name of the person giving the testimonial as the page title
C) Insert the testimonial text into the block editor
D) In the “Employee” box, search for and/or select the employee who the testimonial is for
E) Click “Publish”
If the client wants reviews put on each employee’s page, do the following:
Back to TopCreate Locations
IF the customer has multiple locations, they should be listed in the customer’s “New Customer Info Sheet” in the customer’s Google Drive folder.
Back to TopCreate Google API Key
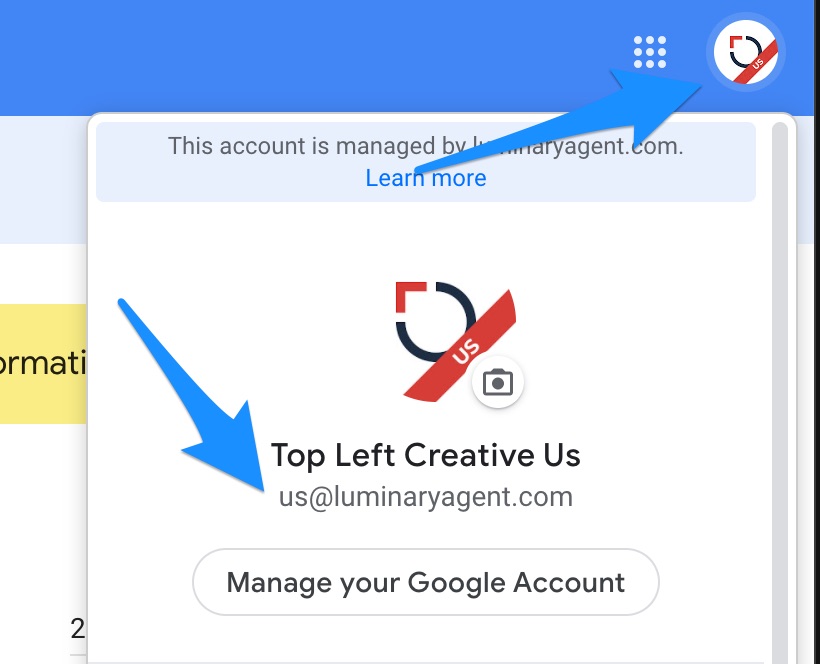
- Log into the “us” account.
- Go to: https://console.developers.google.com/
- Click on the project drop-down at the top left of the screen.
- Choose Luminary Agent as the organization and click on the project for the market.
- Click “Credentials” on the left.
- Click “Create credentials” and then “API Key”.
- Click “Restrict Key”.
- In the name input, type the client’s name.
- Under Key restrictions, choose “HTTP referrers (web sites)“.
- Type in the client’s Live Website from their Airtable record (no http or https and no trailing slash, ex. carolflanagan.com), and their Dev Website from their Airtable record (ex. carolflanagan.myrealty.website).
- Click Save.
Create Homes Sold Map
A) Go to the Google Cloud Console by clicking here
B) Find the API Key named “MAP GEOCODING” and click the copy button

C) Back in the client’s website, activate “WP Google Maps” and “WP Google Maps – Pro Add-On” plugins
Note: Check who you are logged in as on the top right hand side of the page. Make sure you are logged in on your account and not the client’s so that you would have Super Admin Privileges.
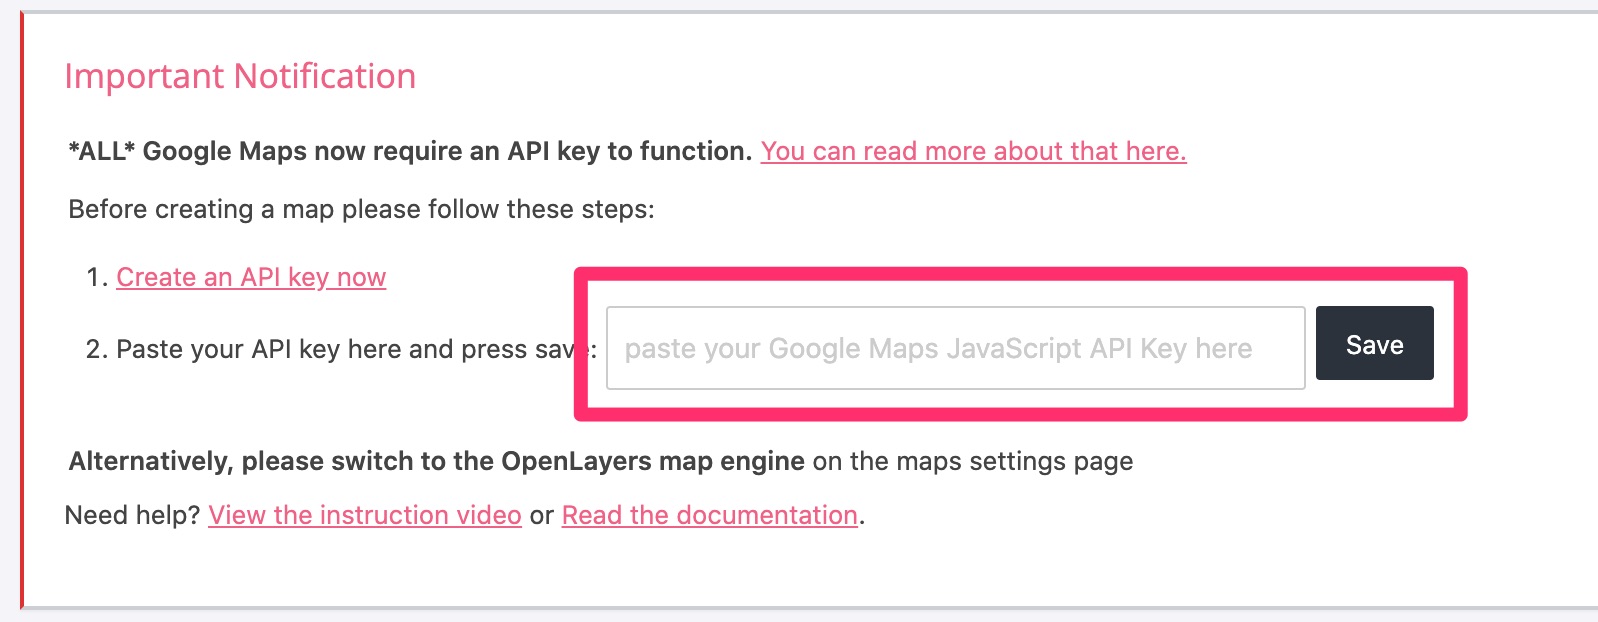
D) Go to Maps > Settings. You should see a dialog box at the top reminding you to paste the Google API key into settings. Go ahead and paste the API key from substep B into the field, and scroll down and click “Save”.
Note: If you don’t see this dialog box, go to the “Advanced” tab in Maps > Settings and paste the key there.
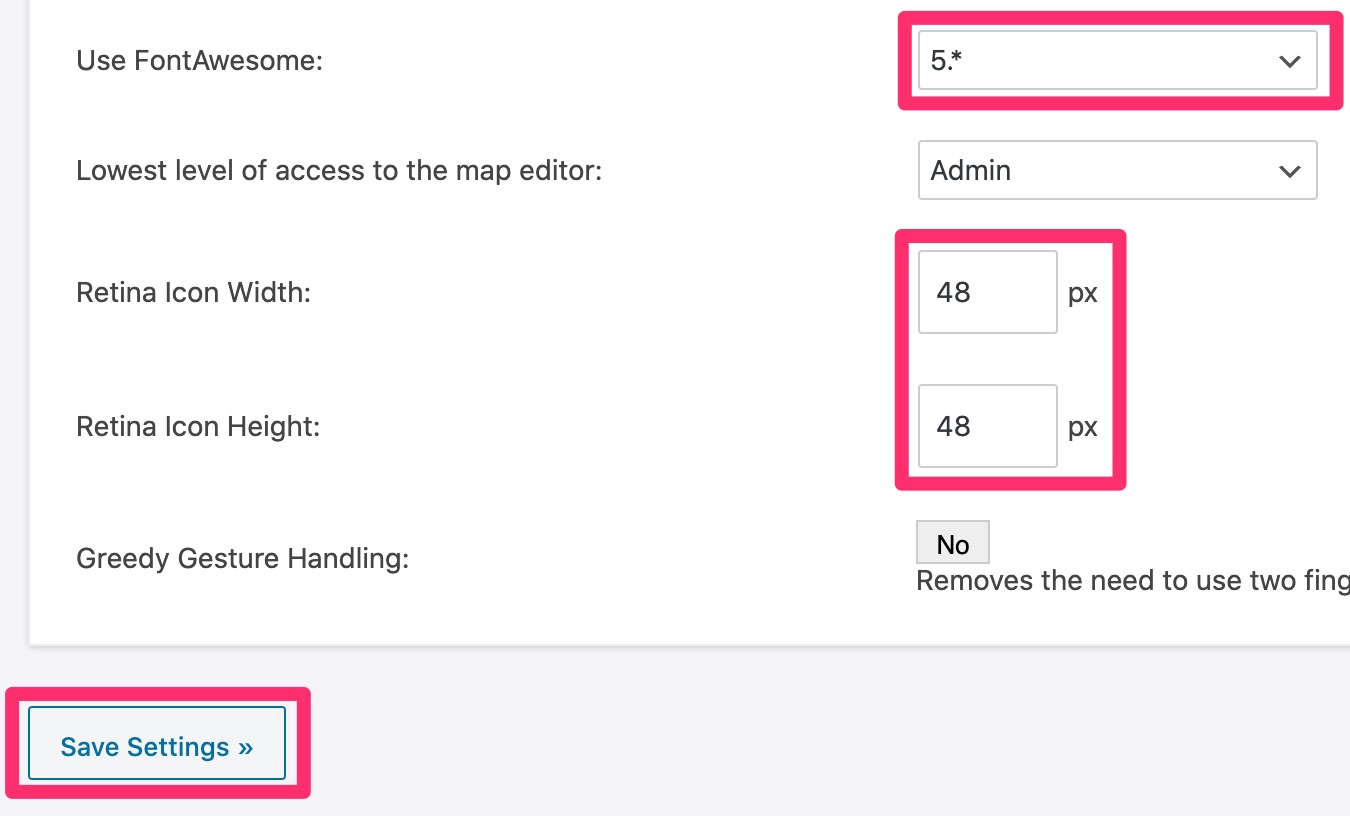
E) Further down the “Maps” tab in Maps > Settings, select “5.*” from the “Use FontAwesome” dropdown
F) Also change the “Retina Icon Width” and “Retina Icon Height” values to 48, and scroll down and click “Save Settings”
G) Go to Maps > Maps and click “Edit” next to Map #1

H) Change the map name to “Homes I’ve Sold”
I) Click on the “Themes” tab and choose theme number 4
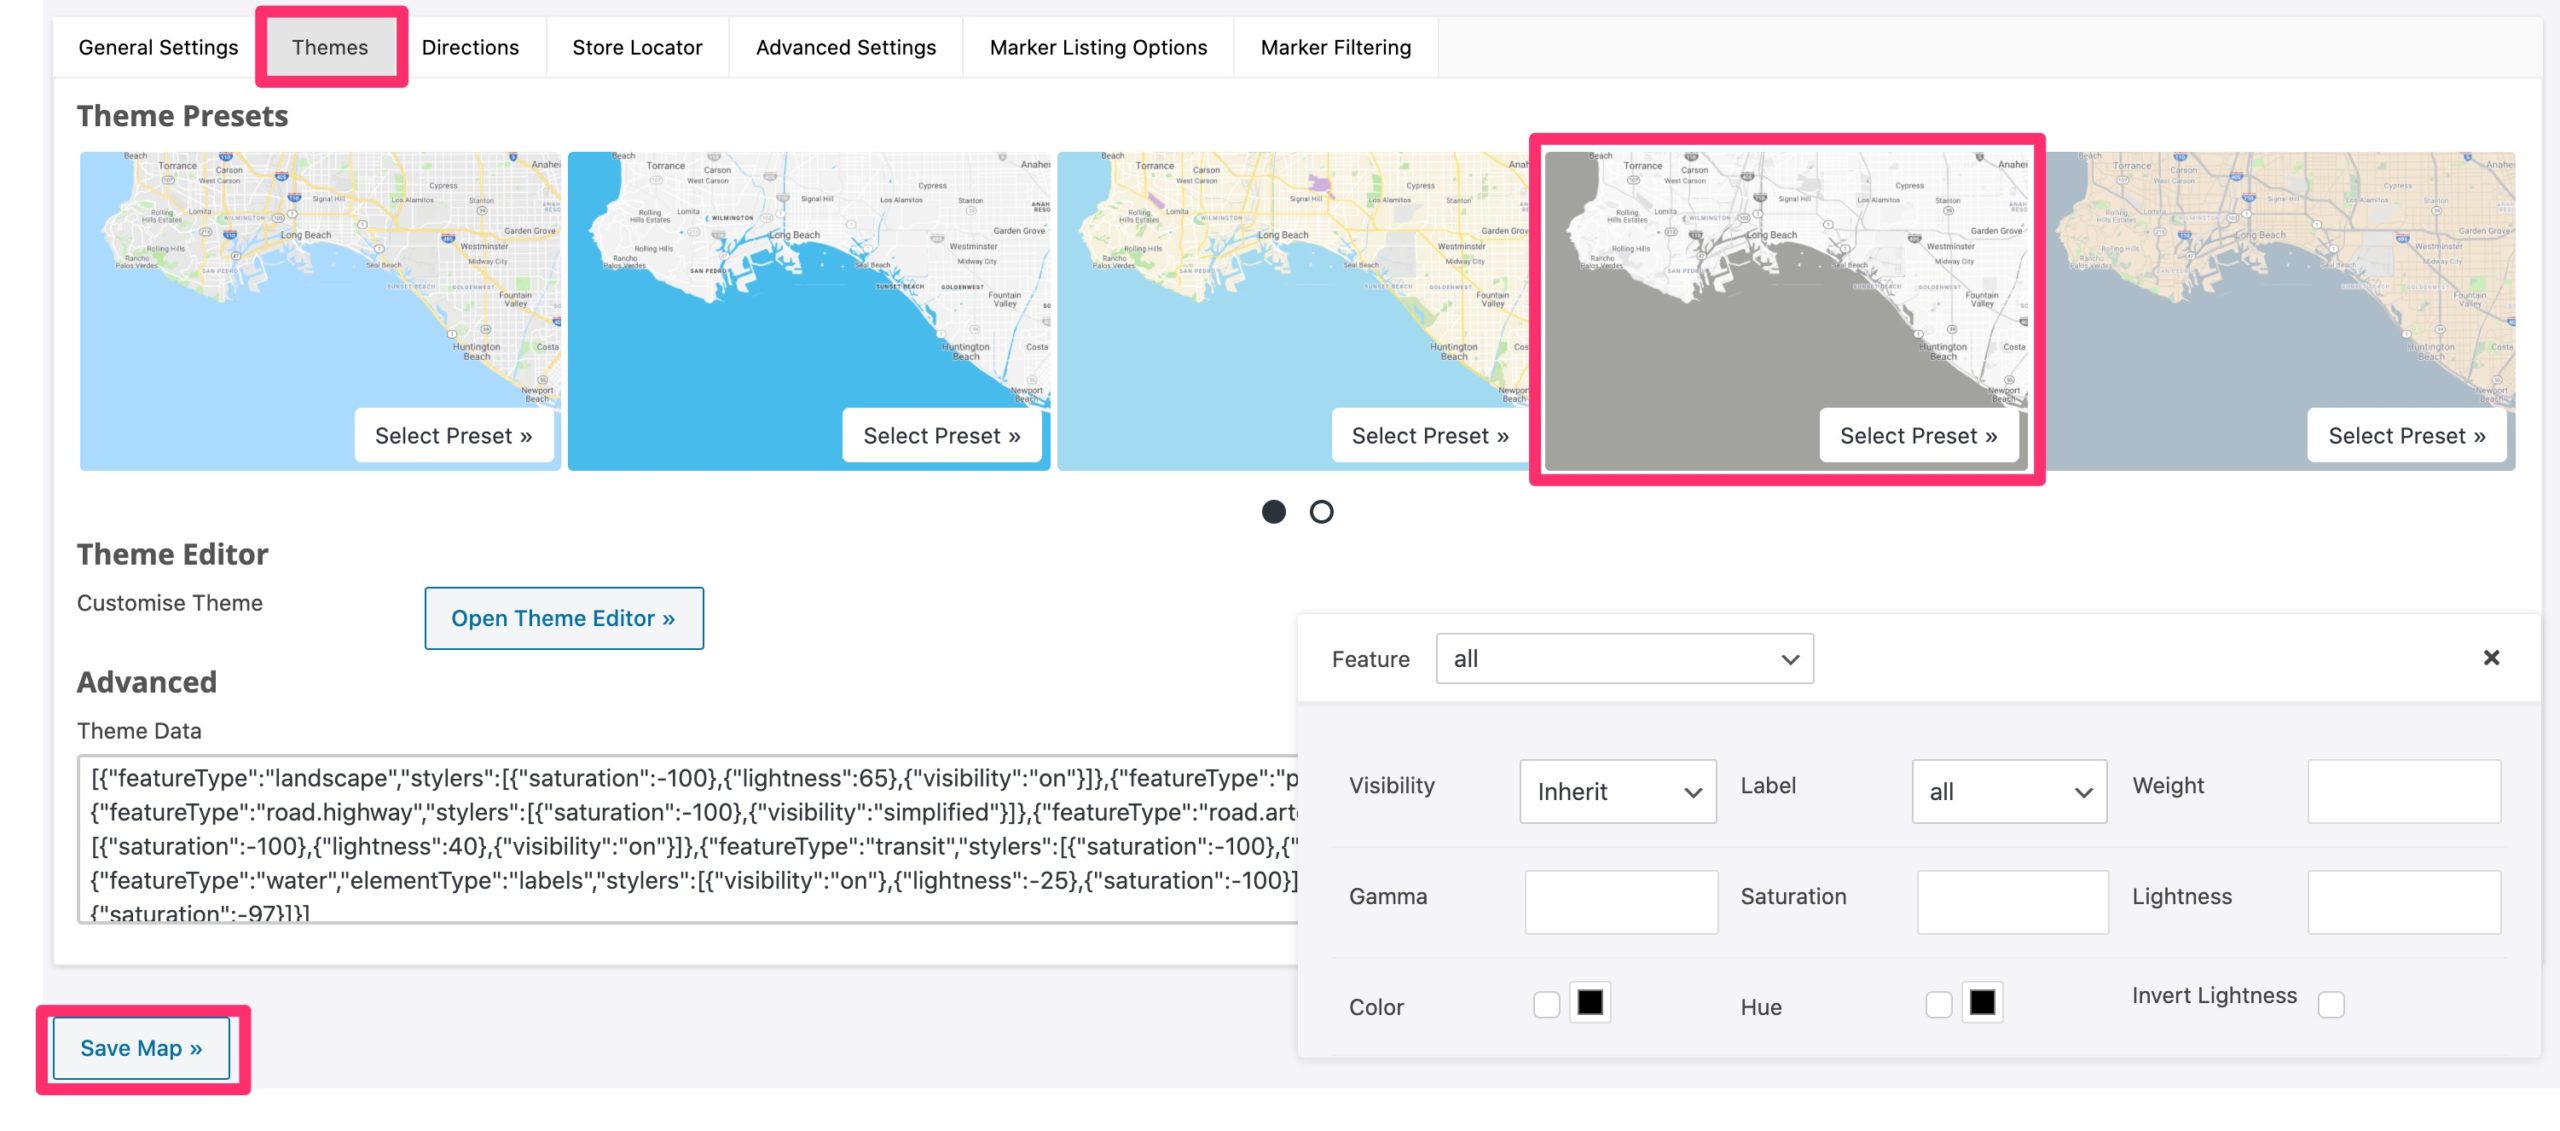
J) Click “Save Map”
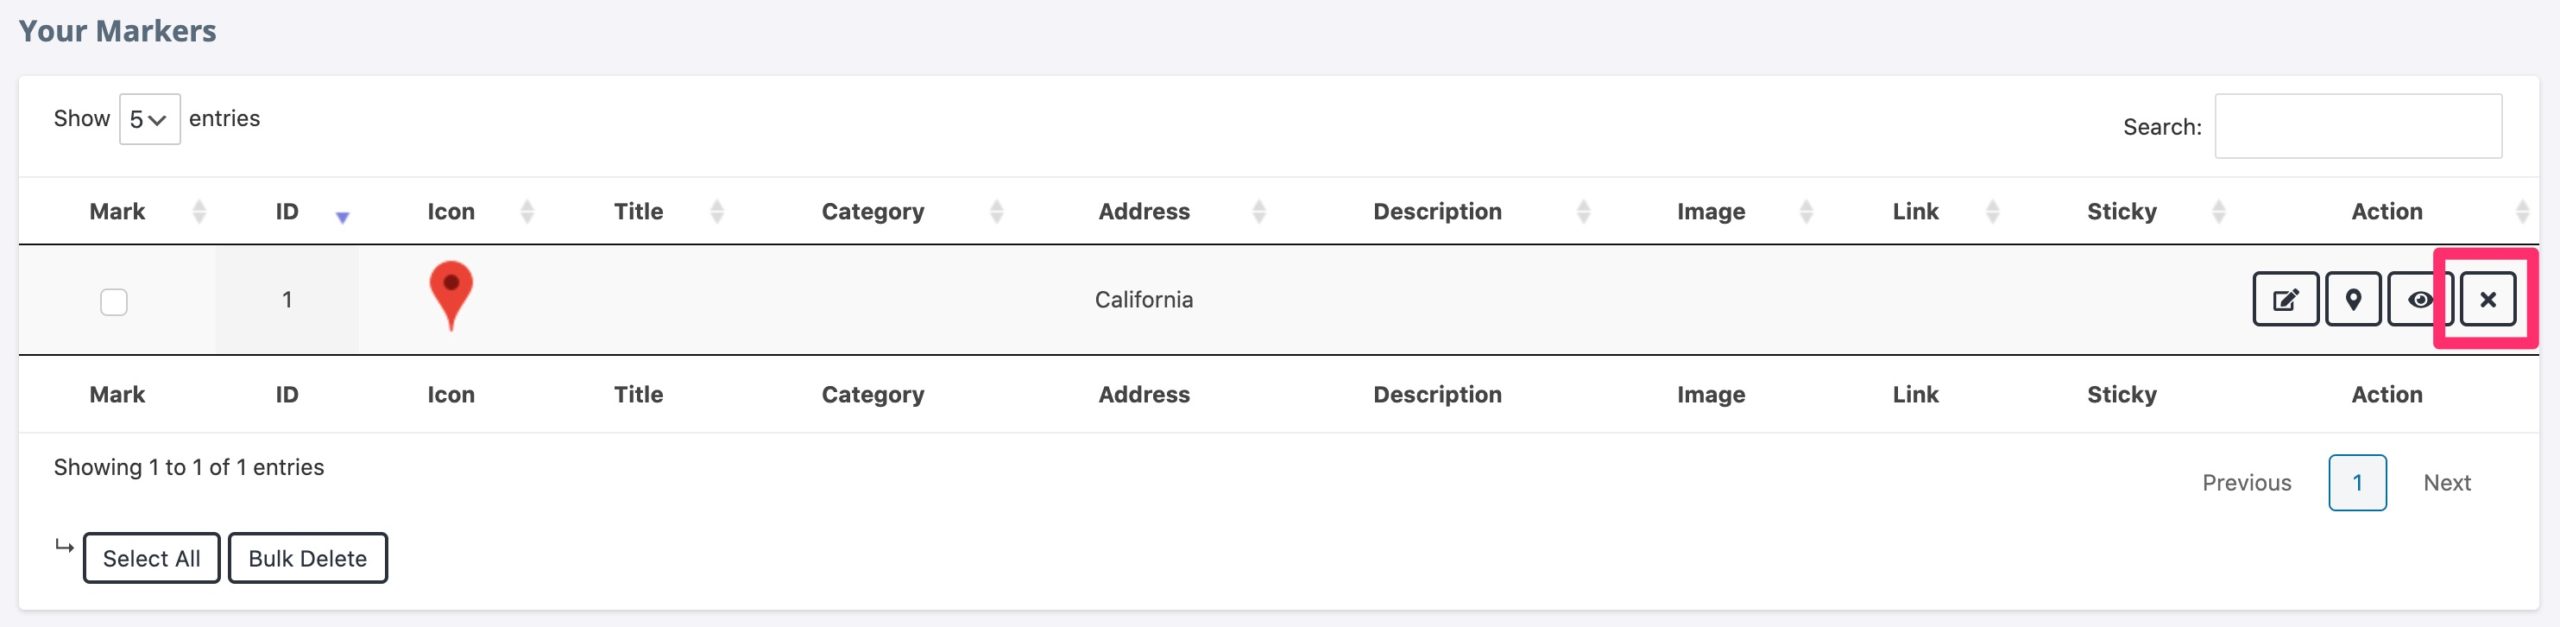
K) At the bottom of the page, under the “Your Markers” heading, delete the default marker
Video
Back to TopCreate Homes Sold Categories
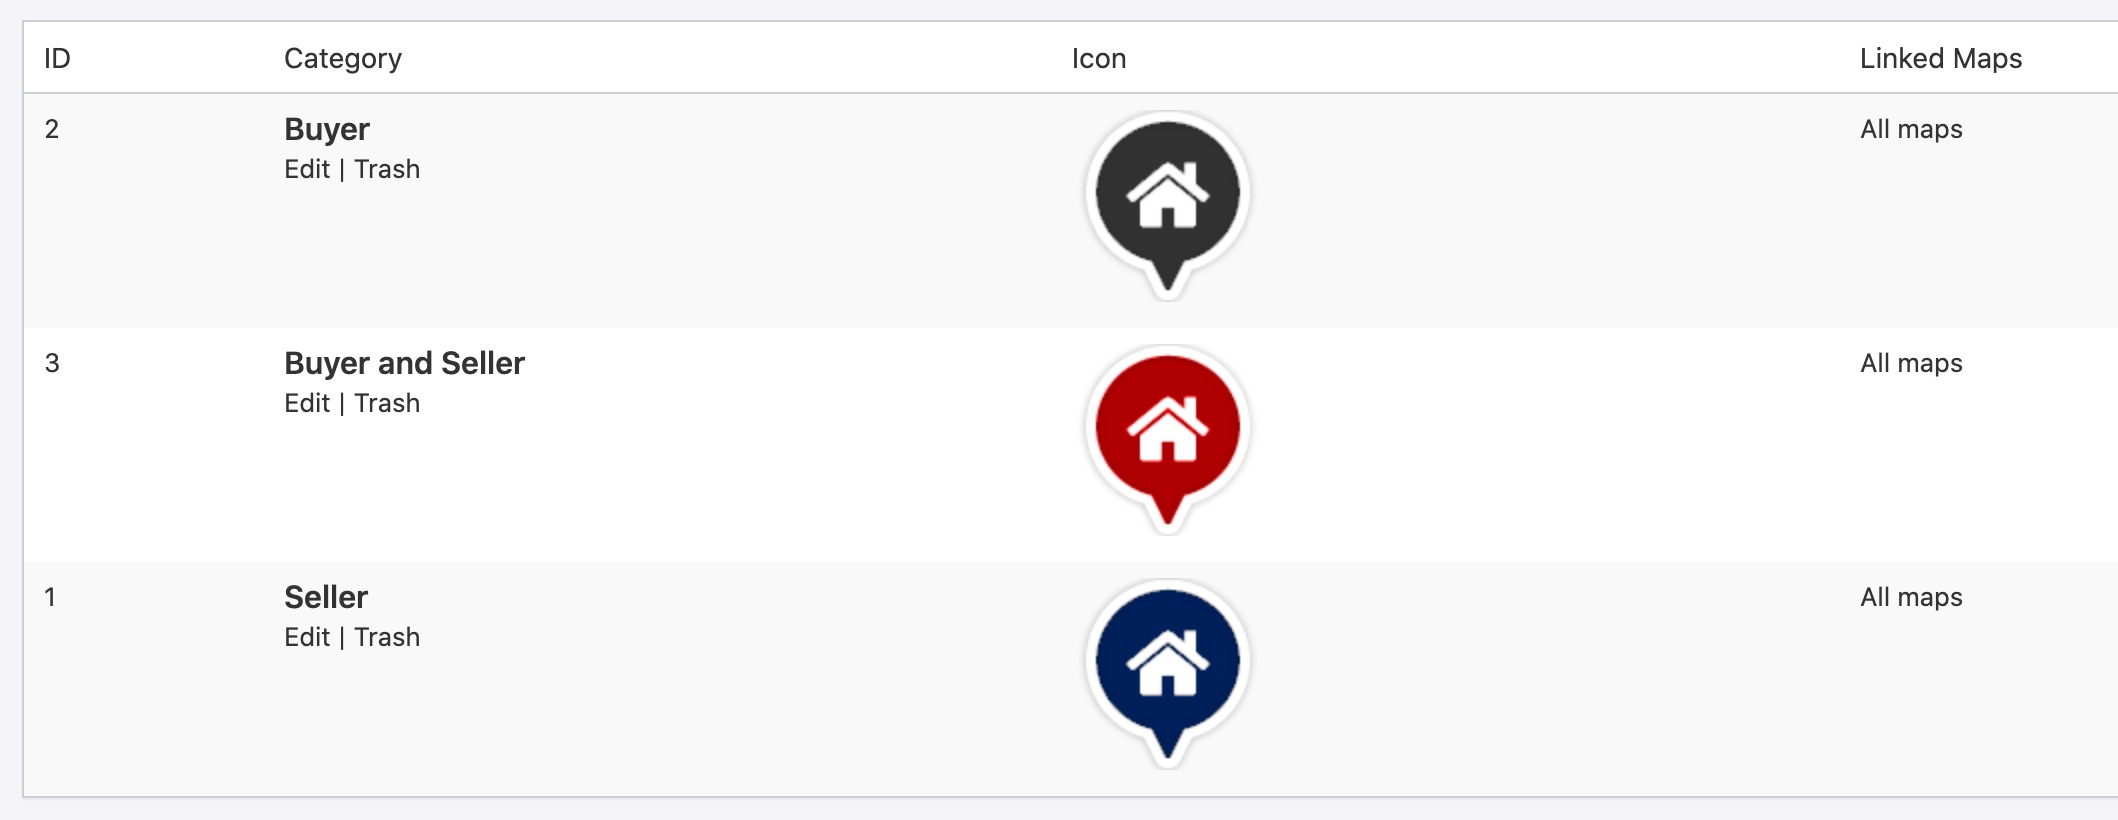
A) Go to Maps > Categories and click “Add New Category” and add three categories—”Seller”, “Buyer”, and “Seller and Buyer”—with the following settings:
- Category Name: (Seller) or (Buyer) or (Seller and Buyer)
- Category Marker: See instructions below to make the category marker
- Retina Ready: Toggle on
- Assigned to: Toggle “All Maps” on
When you’re done, you should have three marker categories created, like so:
To create the marker:
B) Choose “Marker Library”, type “home” in the search box, press “enter” on your keyboard, and choose the fourth marker
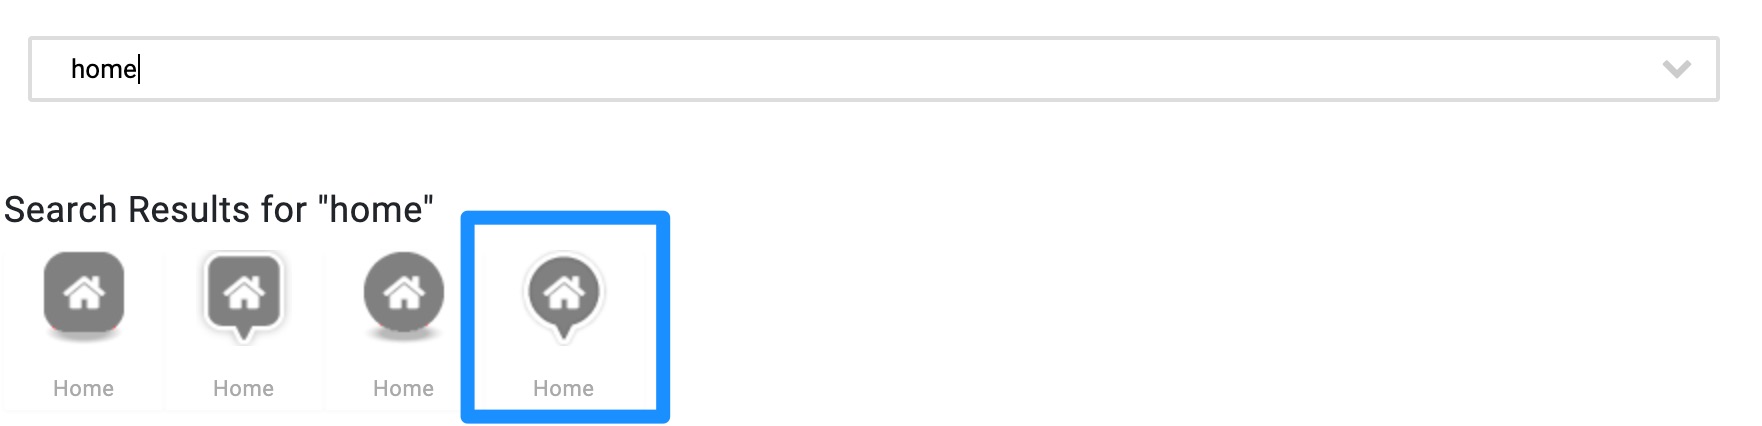
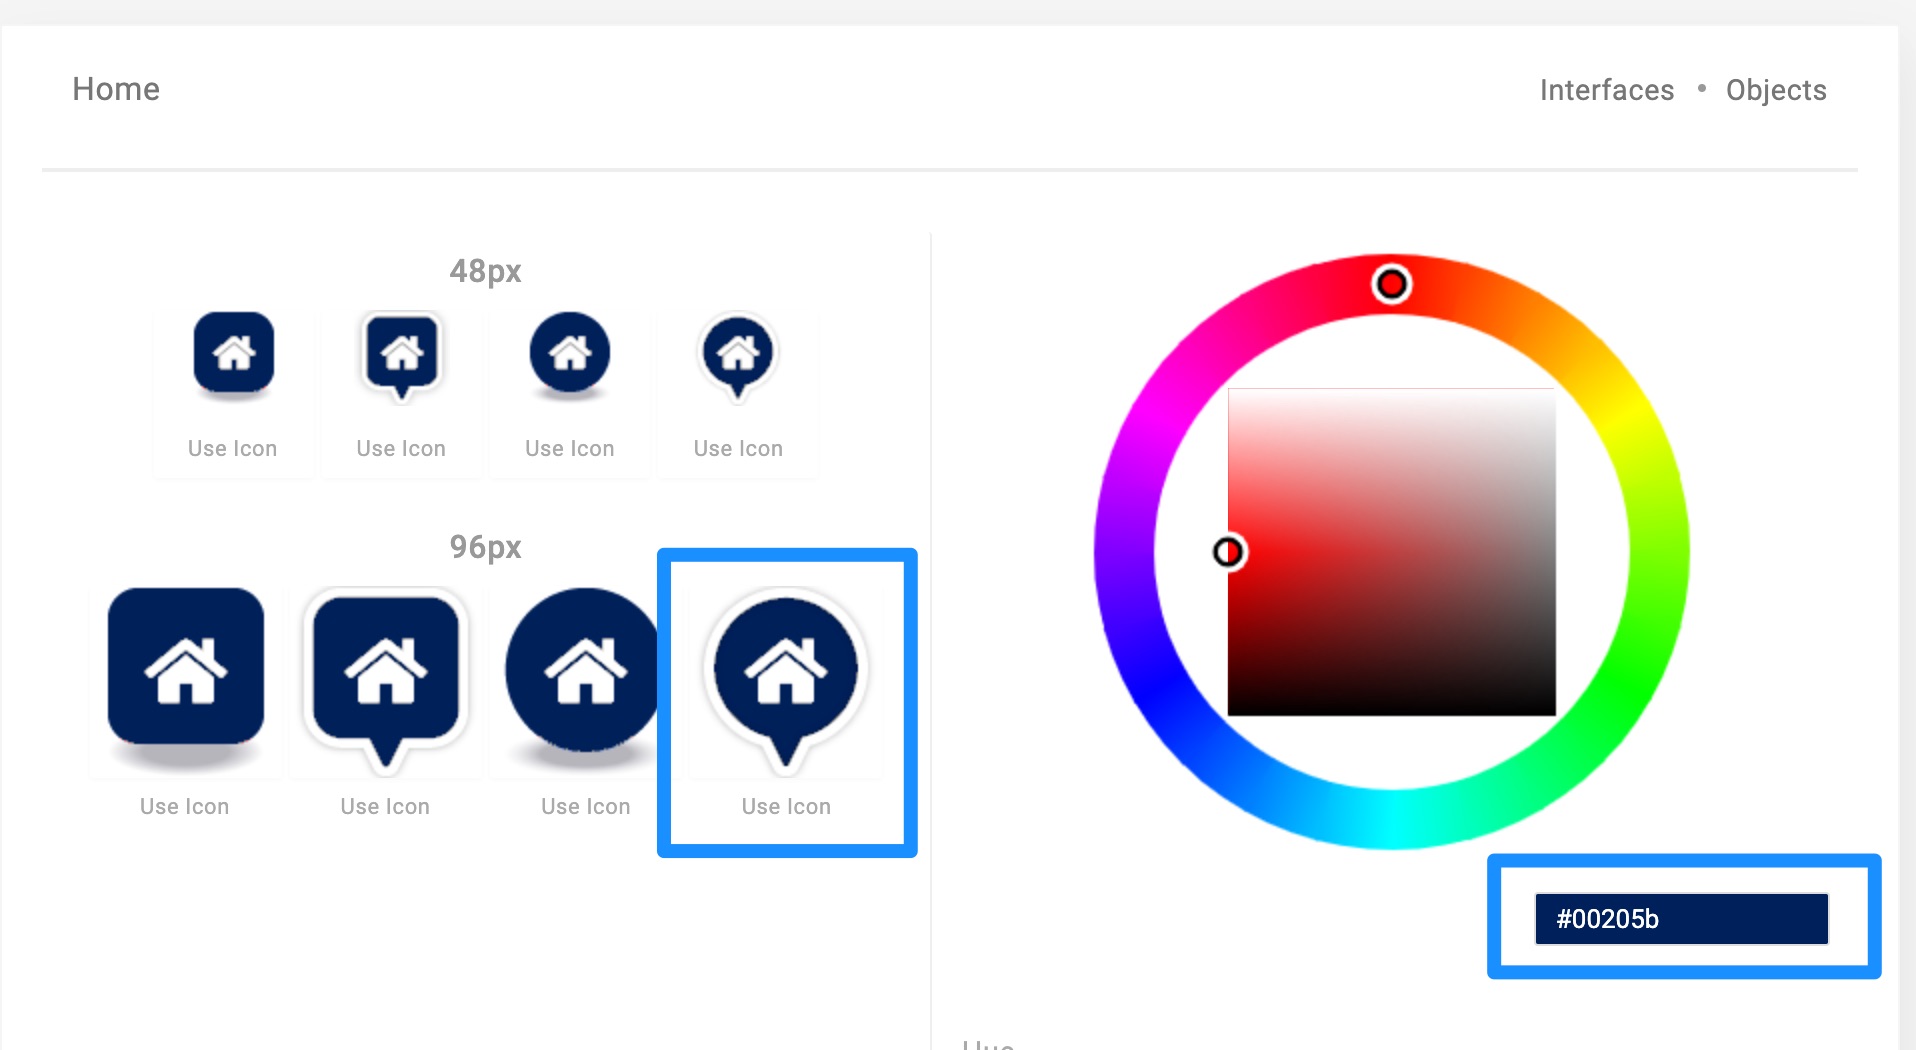
C) When the dialog box appears, enter the hex code for the client’s brand color into the box and click on the fourth 96px icon
NOTE: Use their CTA Color for “Seller”, Brand Color 01 for “Buyer”, and Brand Color 02 for “Buyer and Seller”
NOTE: If the color doesn’t change when entering the hex code, move the circle in the rainbow box and re-try. Sometimes it gets stuck.
Video
Back to TopSetup and Import Client's Sold Homes File
A) Download this .csv file to use as the import file and delete all the dummy data
B) Copy the following data from the file provided into the template file you just downloaded.
- id: copy MLS number, if provided. Otherwise, leave blank.
- address: copy complete address here – NOTE: you may need to combine multiple columns. This must have the street address, city, and state!
- category: enter either 1 or 2, depending on the category number you just created in the previous step
- approved: 1
- retina: 1
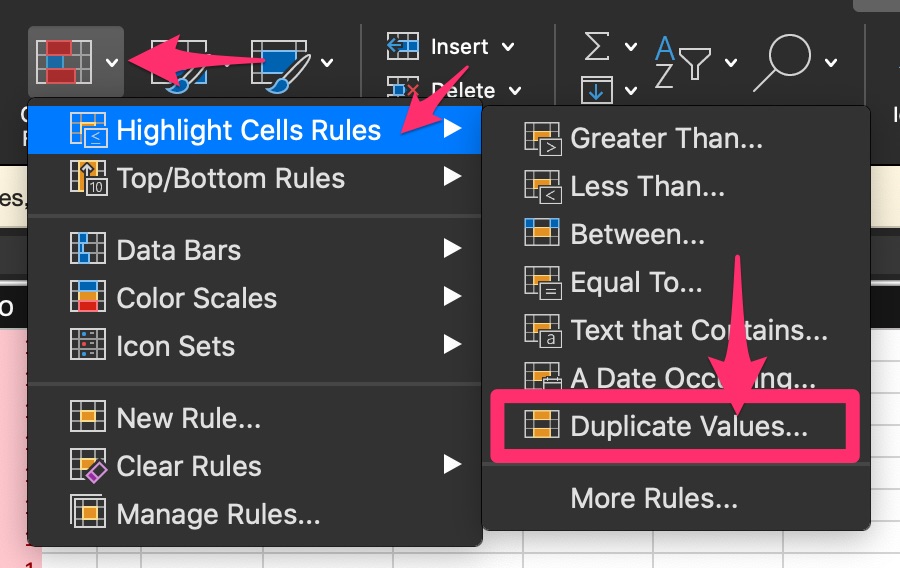
C) Select all of the rows and go to Conditional Formatting > Highlight Cells Rules > Duplicate Values…
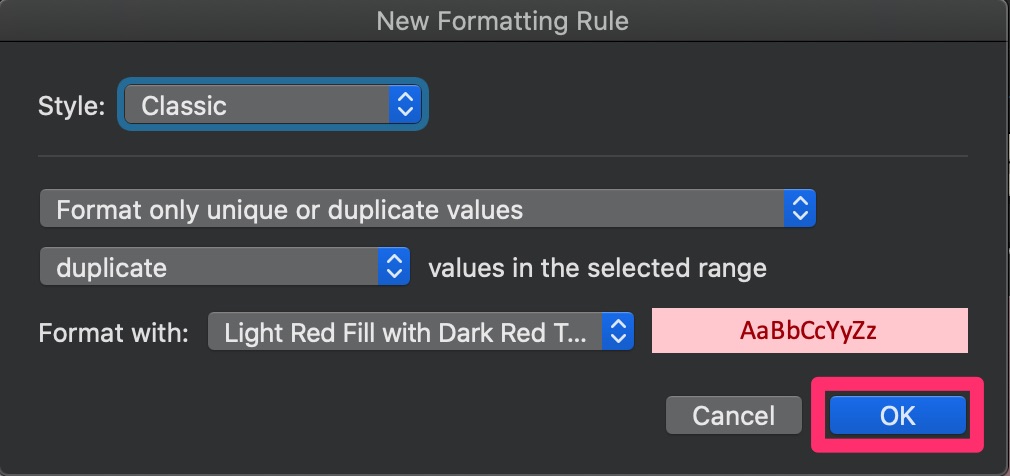
D) When the dialog box appears, simply click “OK”
If there are no duplicate addresses, then there will be no red cells in the “address” column. If so, skip to substep J.
E) Next, click Sort and Filter > Filter from the ribbon
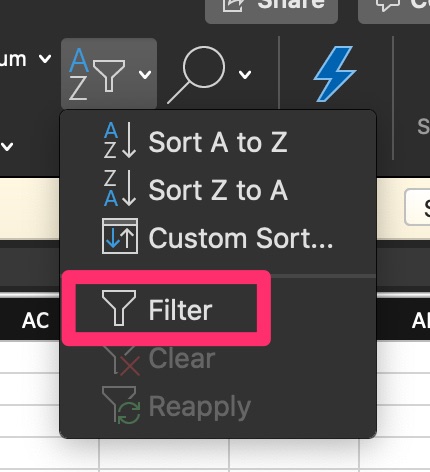
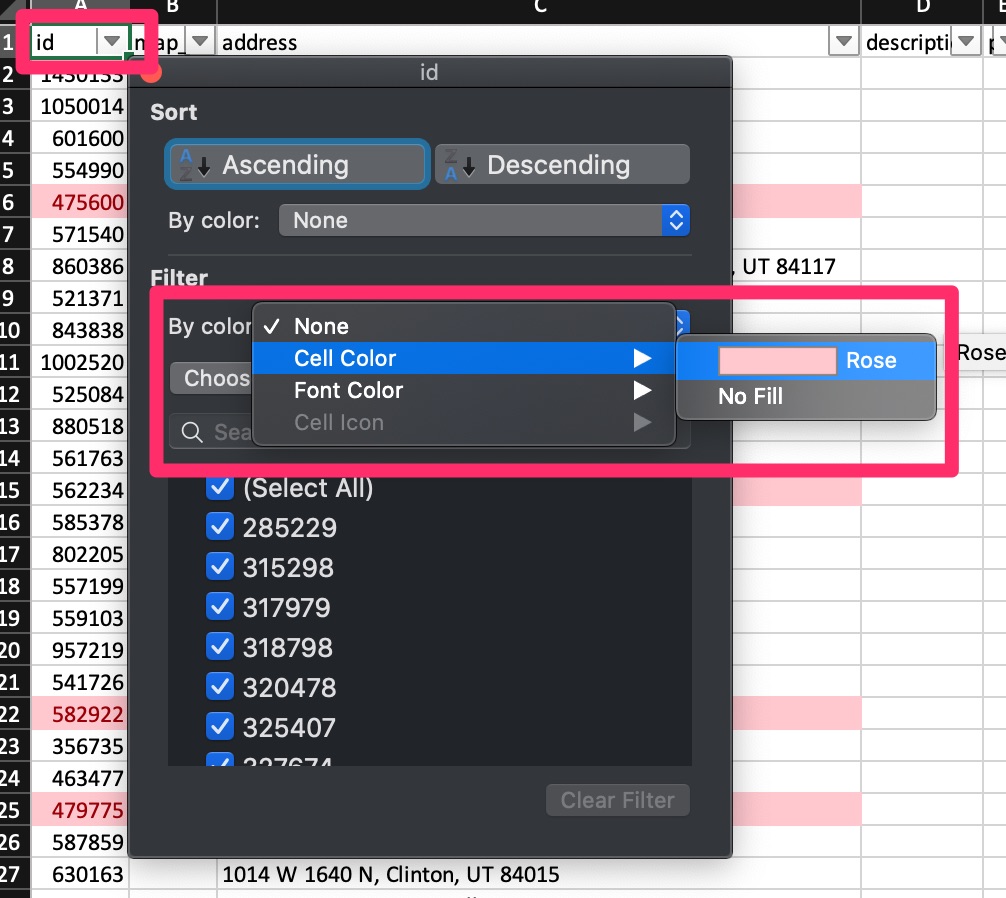
F) Click on the ID Filter, click on the “By Color” select field, and choose “Cell Color” > “Rose”. This will filter all homes sold where our client represented both the buyer and the seller.
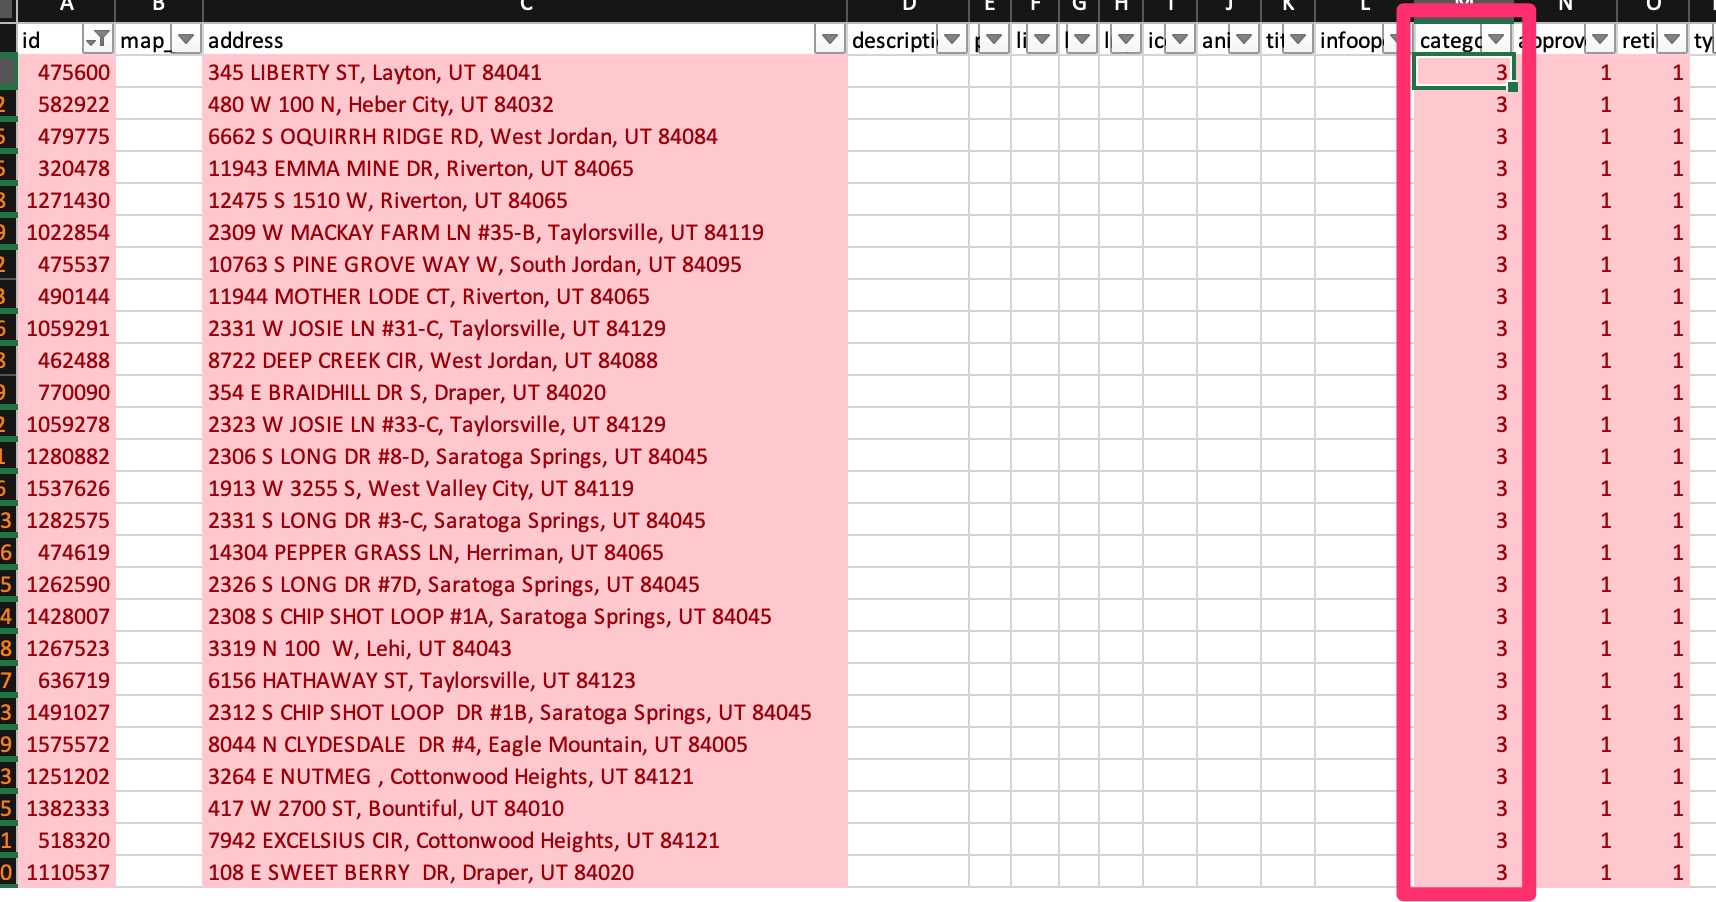
G) Change the category ID ONLY to match the “Buyer and Seller” category ID
H) Click on the ID filter again and click “Clear filter”
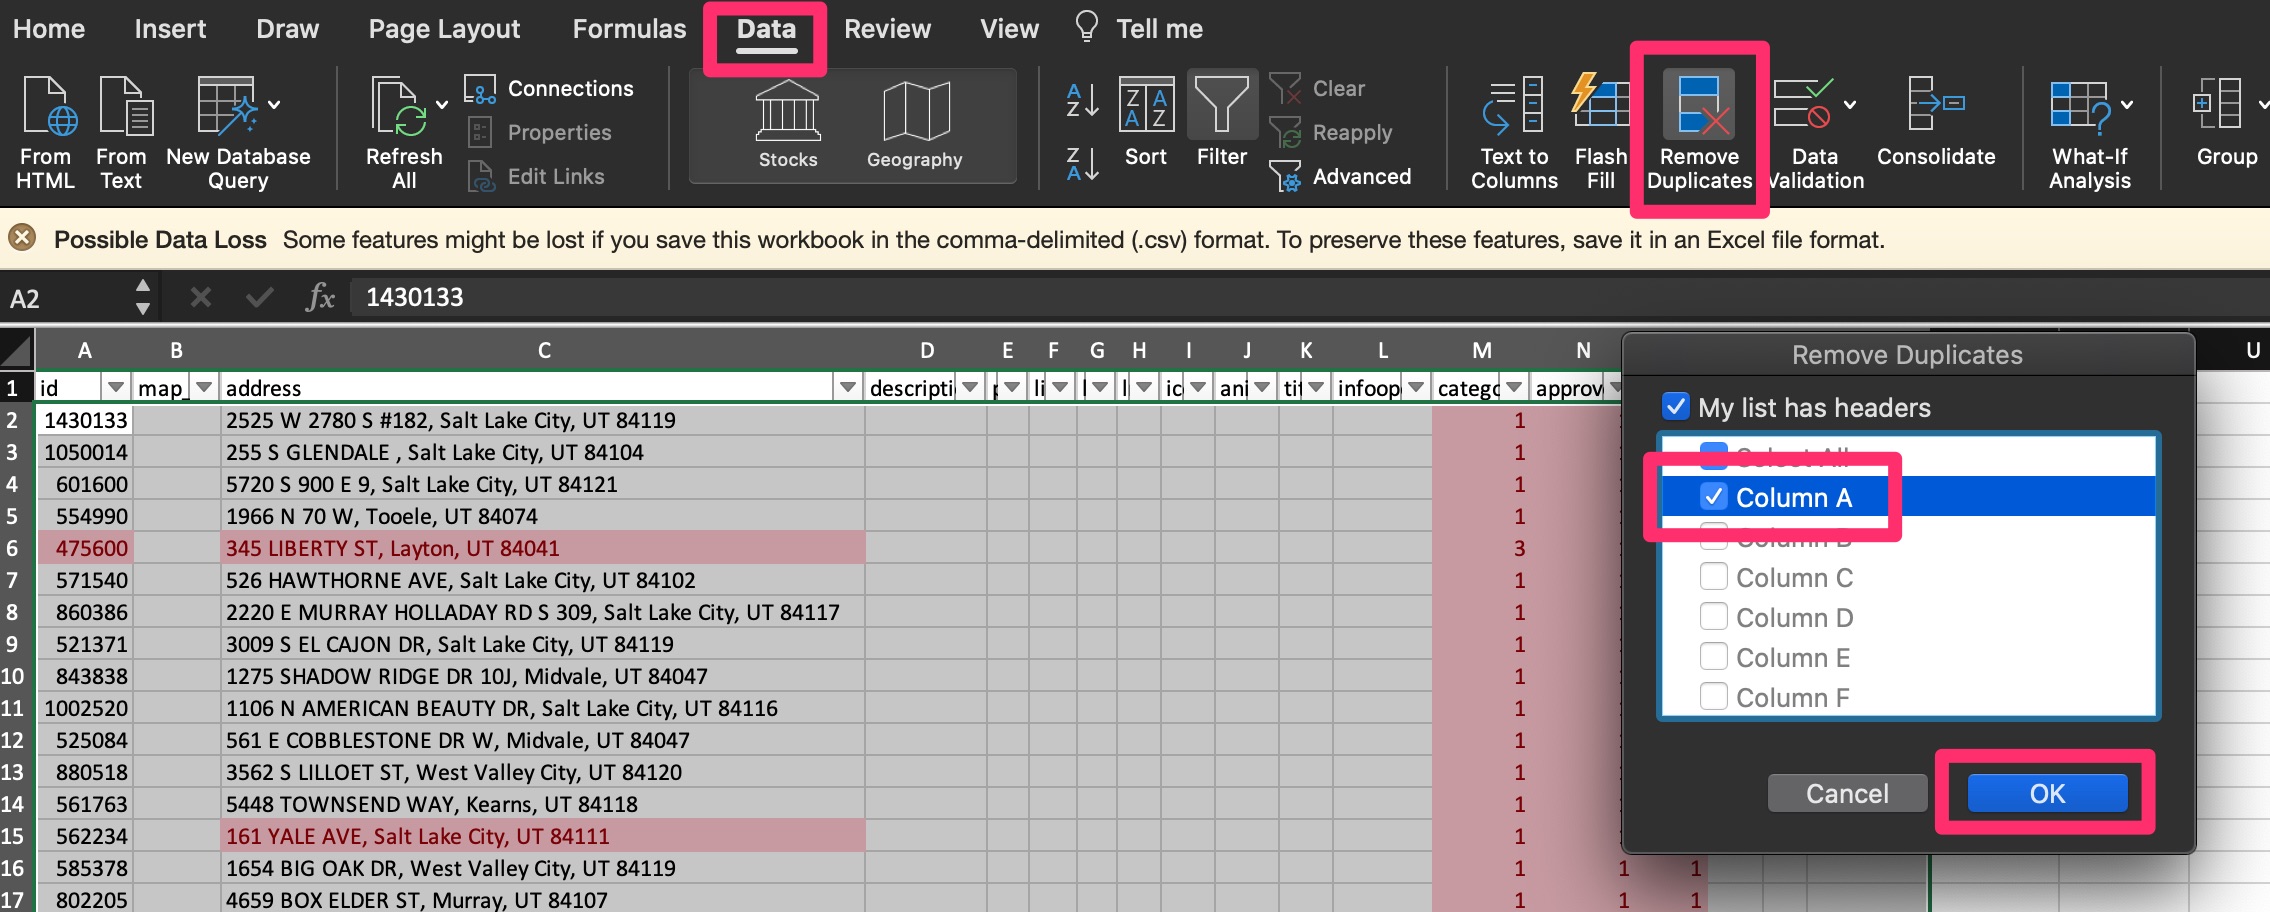
I) Click on the “Data” ribbon, click “Remove Duplicates”, select ONLY “Column A” and click “OK”. When the dialog box appears telling you how many duplicates it removed, click “OK” again.
J) Save the spreadsheet in the client’s “Websites” folder in their Dropbox folder. Use the name [Client Initials]_Websites_Sold Homes
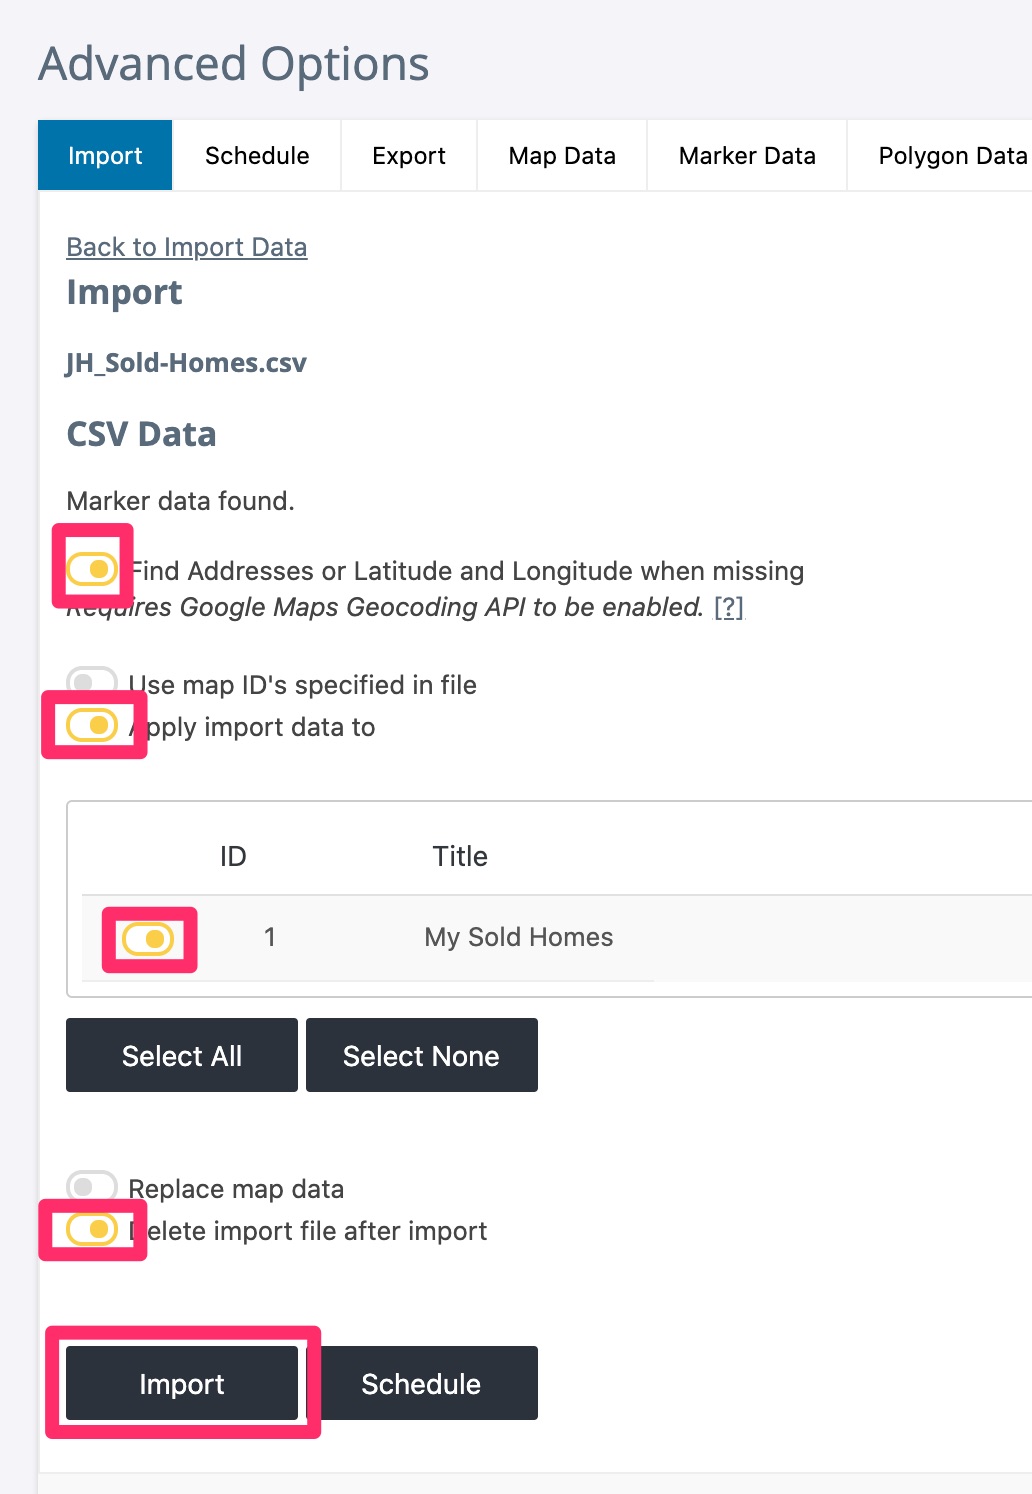
K) Go to Maps > Advanced
L) Click “Import via: File”, select the file you just saved, and click “Upload”
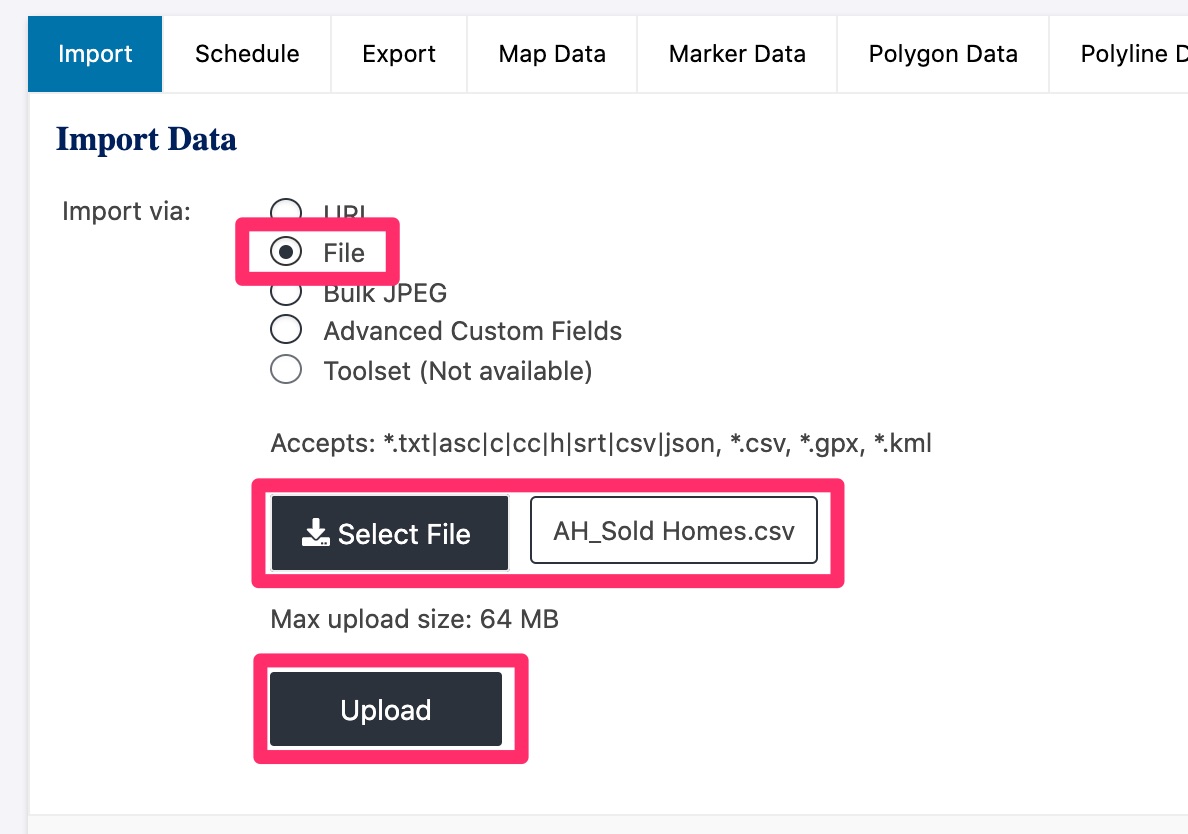
M) Toggle on the following and click “Import”
- Find Addresses or Latitude and Longitude when missing
- Apply import data to
- Map “My Sold Homes”
- Delete import file after import
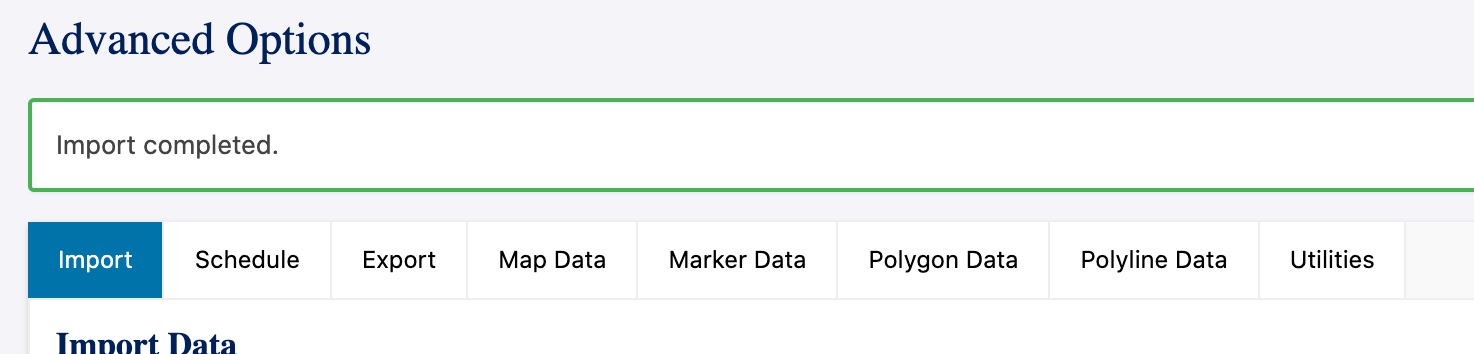
N) After a few seconds to a few minutes, you should see a confirmation message like so:
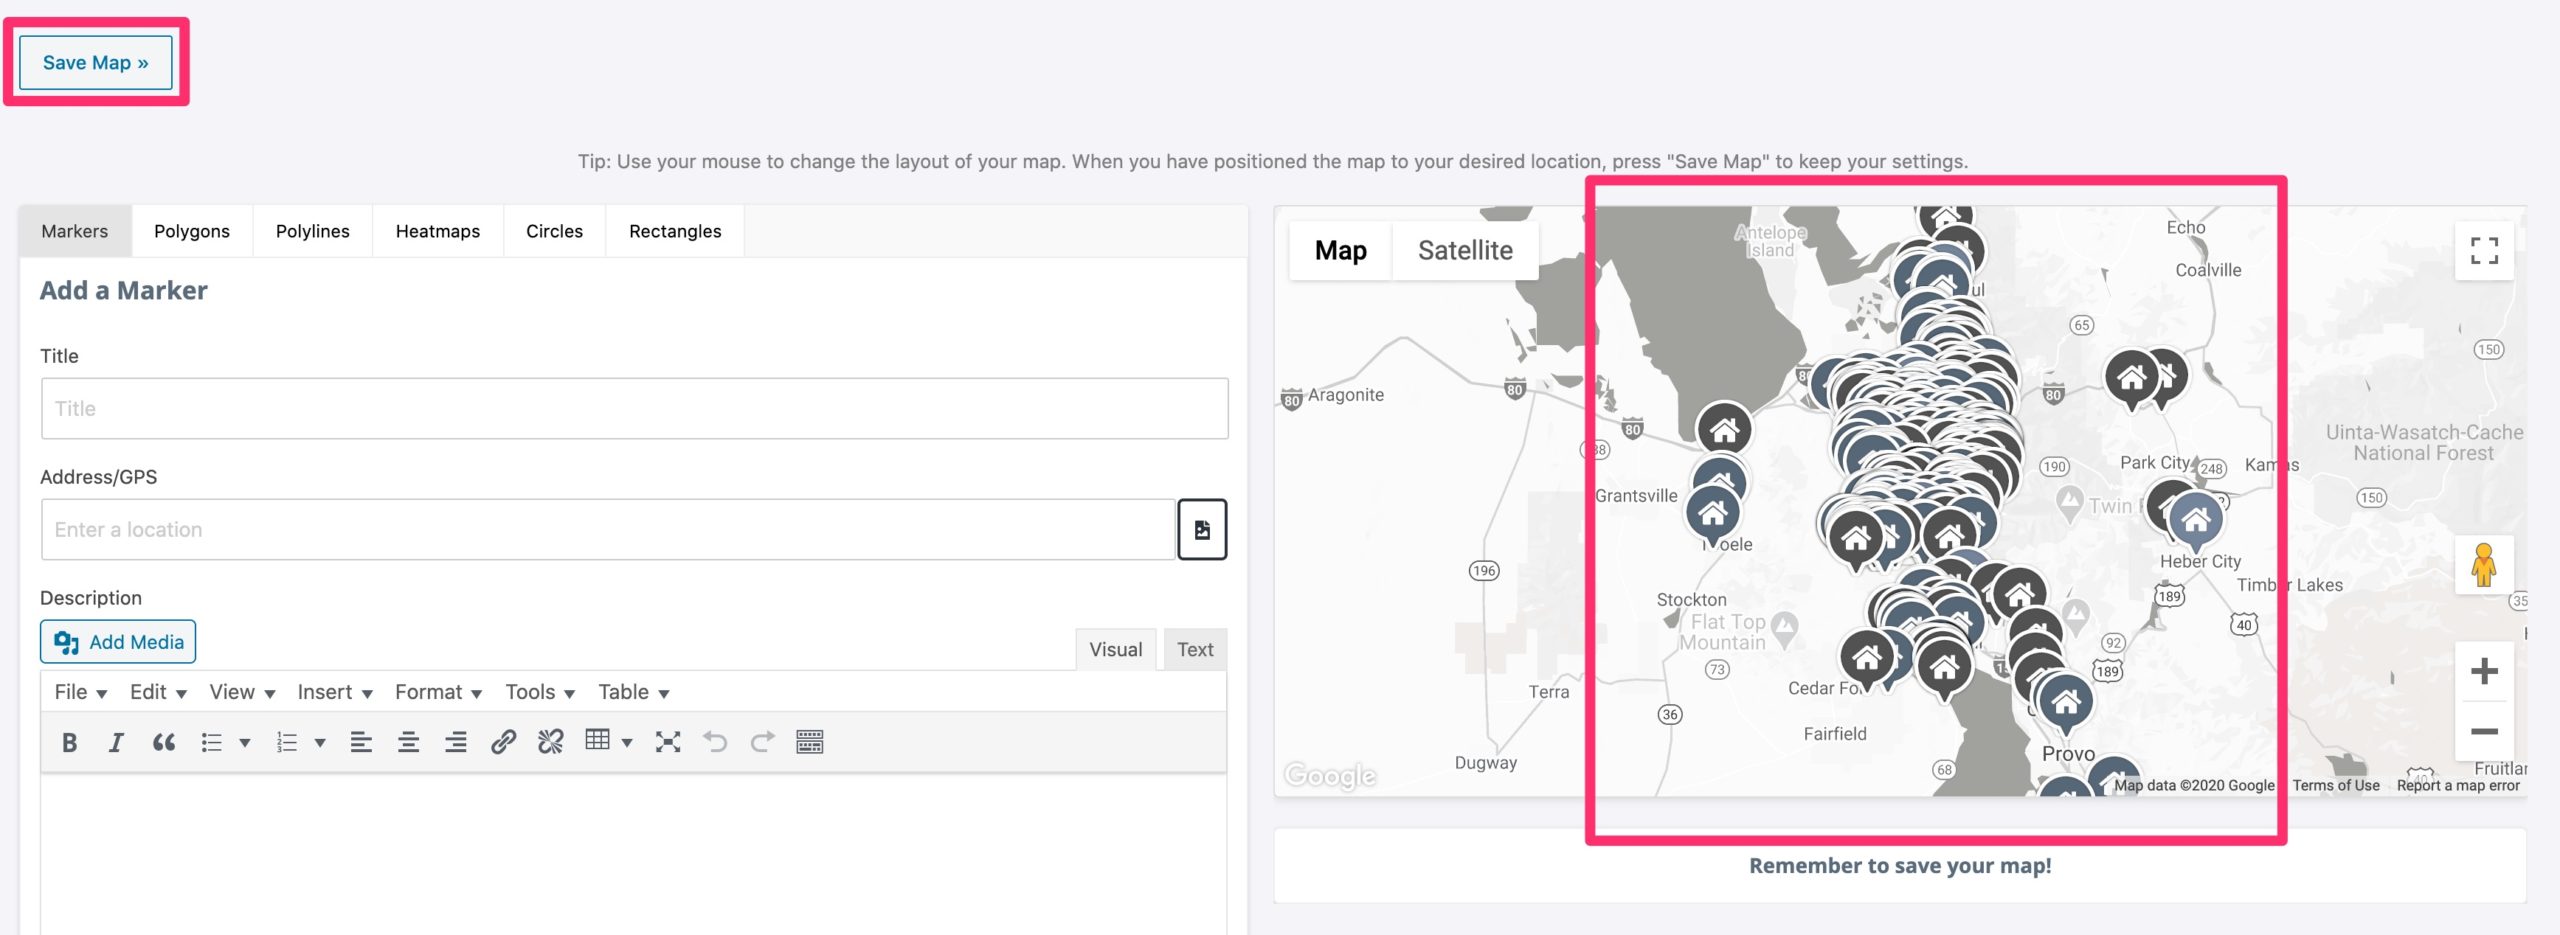
O) Go back to Maps > Maps and click “Edit” next to the “My Sold Homes” map
P) Zoom in and center the map on the cluster of pins and click “Save Map”
Q) Open the Customizer, go to TLC Settings > Tracking/API Codes, and copy the Google API Key
R) Go to Maps > Settings, click on the “Advanced” tab, delete the Google Maps API Key from the box, and replace it with the Google API Key you just copied.uta
S) Scroll down and click “Save Settings”
Video
Back to TopSetup HomeJunction IDX (Optional)
If the client has opted into our HomeJunction IDX provider, complete this step.
A) To find out if a client has opted into HomeJunction IDX, see if the product has been attached to their contact record in Airtable. You should see product “13a – HomeJunction” in their product list.
B) Go to Plugins and activate the following plugins:
- HJI Membership
- HJI Responsive IDX
- HJI Shortcode Reference
- HJI Users
C) In the client’s Airtable contact record, find their HomeJunction API key and copy it
D) Go to HJI Membership, paste the license key, and click “Save Settings”
E) Click “Upload Photo” next to the “Photo URL” setting, select the client’s photo, and click “Select”
F) Click “Upload Logo” next to the “Logo URL” setting, select the client’s color logo, and click “Select”
G) Click “Update Licensee Information”
H) Go to Responsive IDX
I) In the “General” tab, enter the client’s email address in the “Leads Email Address” field, scroll to the bottom and click “Save Changes”
J) In the “Offices/Agents” tab, click “Add” underneath the “Offices” box, search for the client’s office, select it from the results, and click “Insert”, “OK” and then “Close”
K) Repeat the same steps for the “Agents” box, searching instead for the agent’s name
L) Click “Save Changes”
M) Under “User Registration”, select “Checkbox” in the “Display reCAPTCHA” dropdown and click “Save Changes”
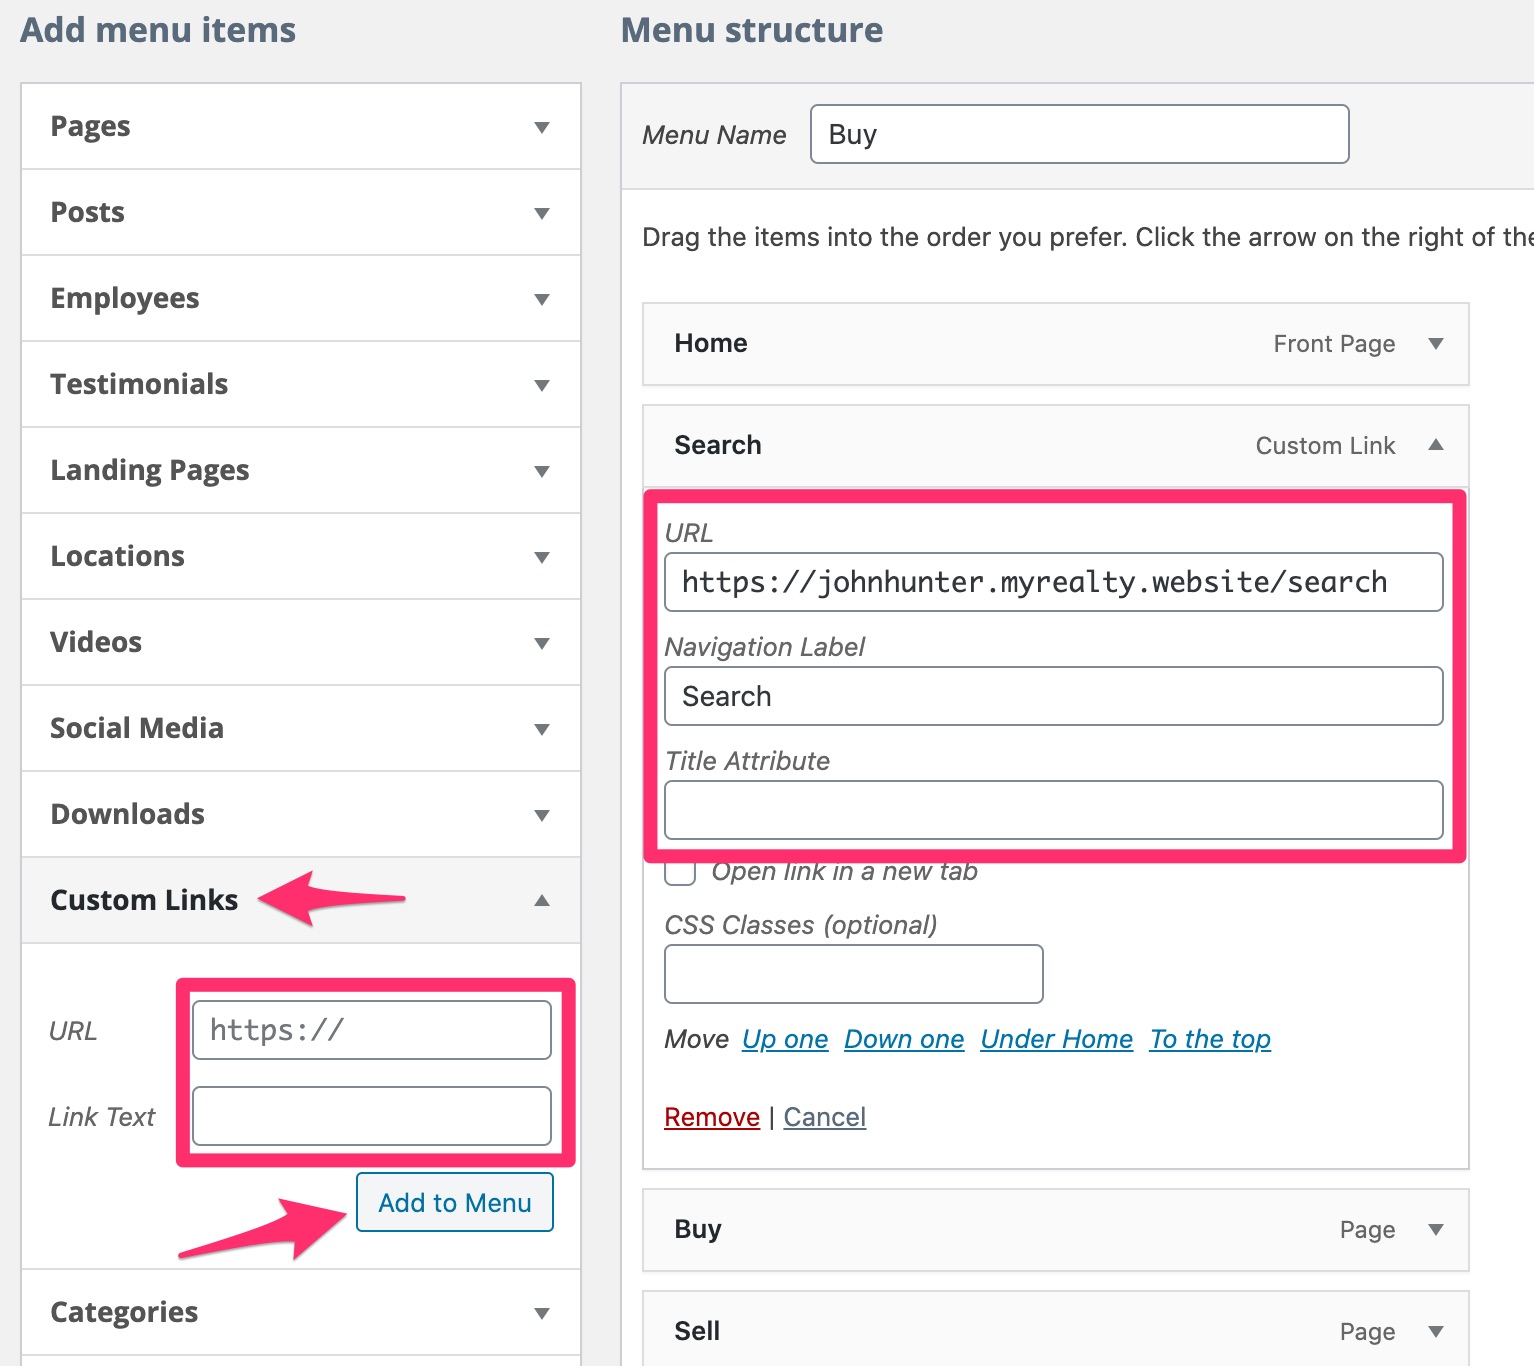
N) Go to Appearance > Menus, click on “Custom Links”, enter the client’s staging domain name + “/search” in the URL box, type “Search” for the “Link Text”, and click “Add to Menu”
O) Position it directly under the “Home” menu link then click “Save Menu”
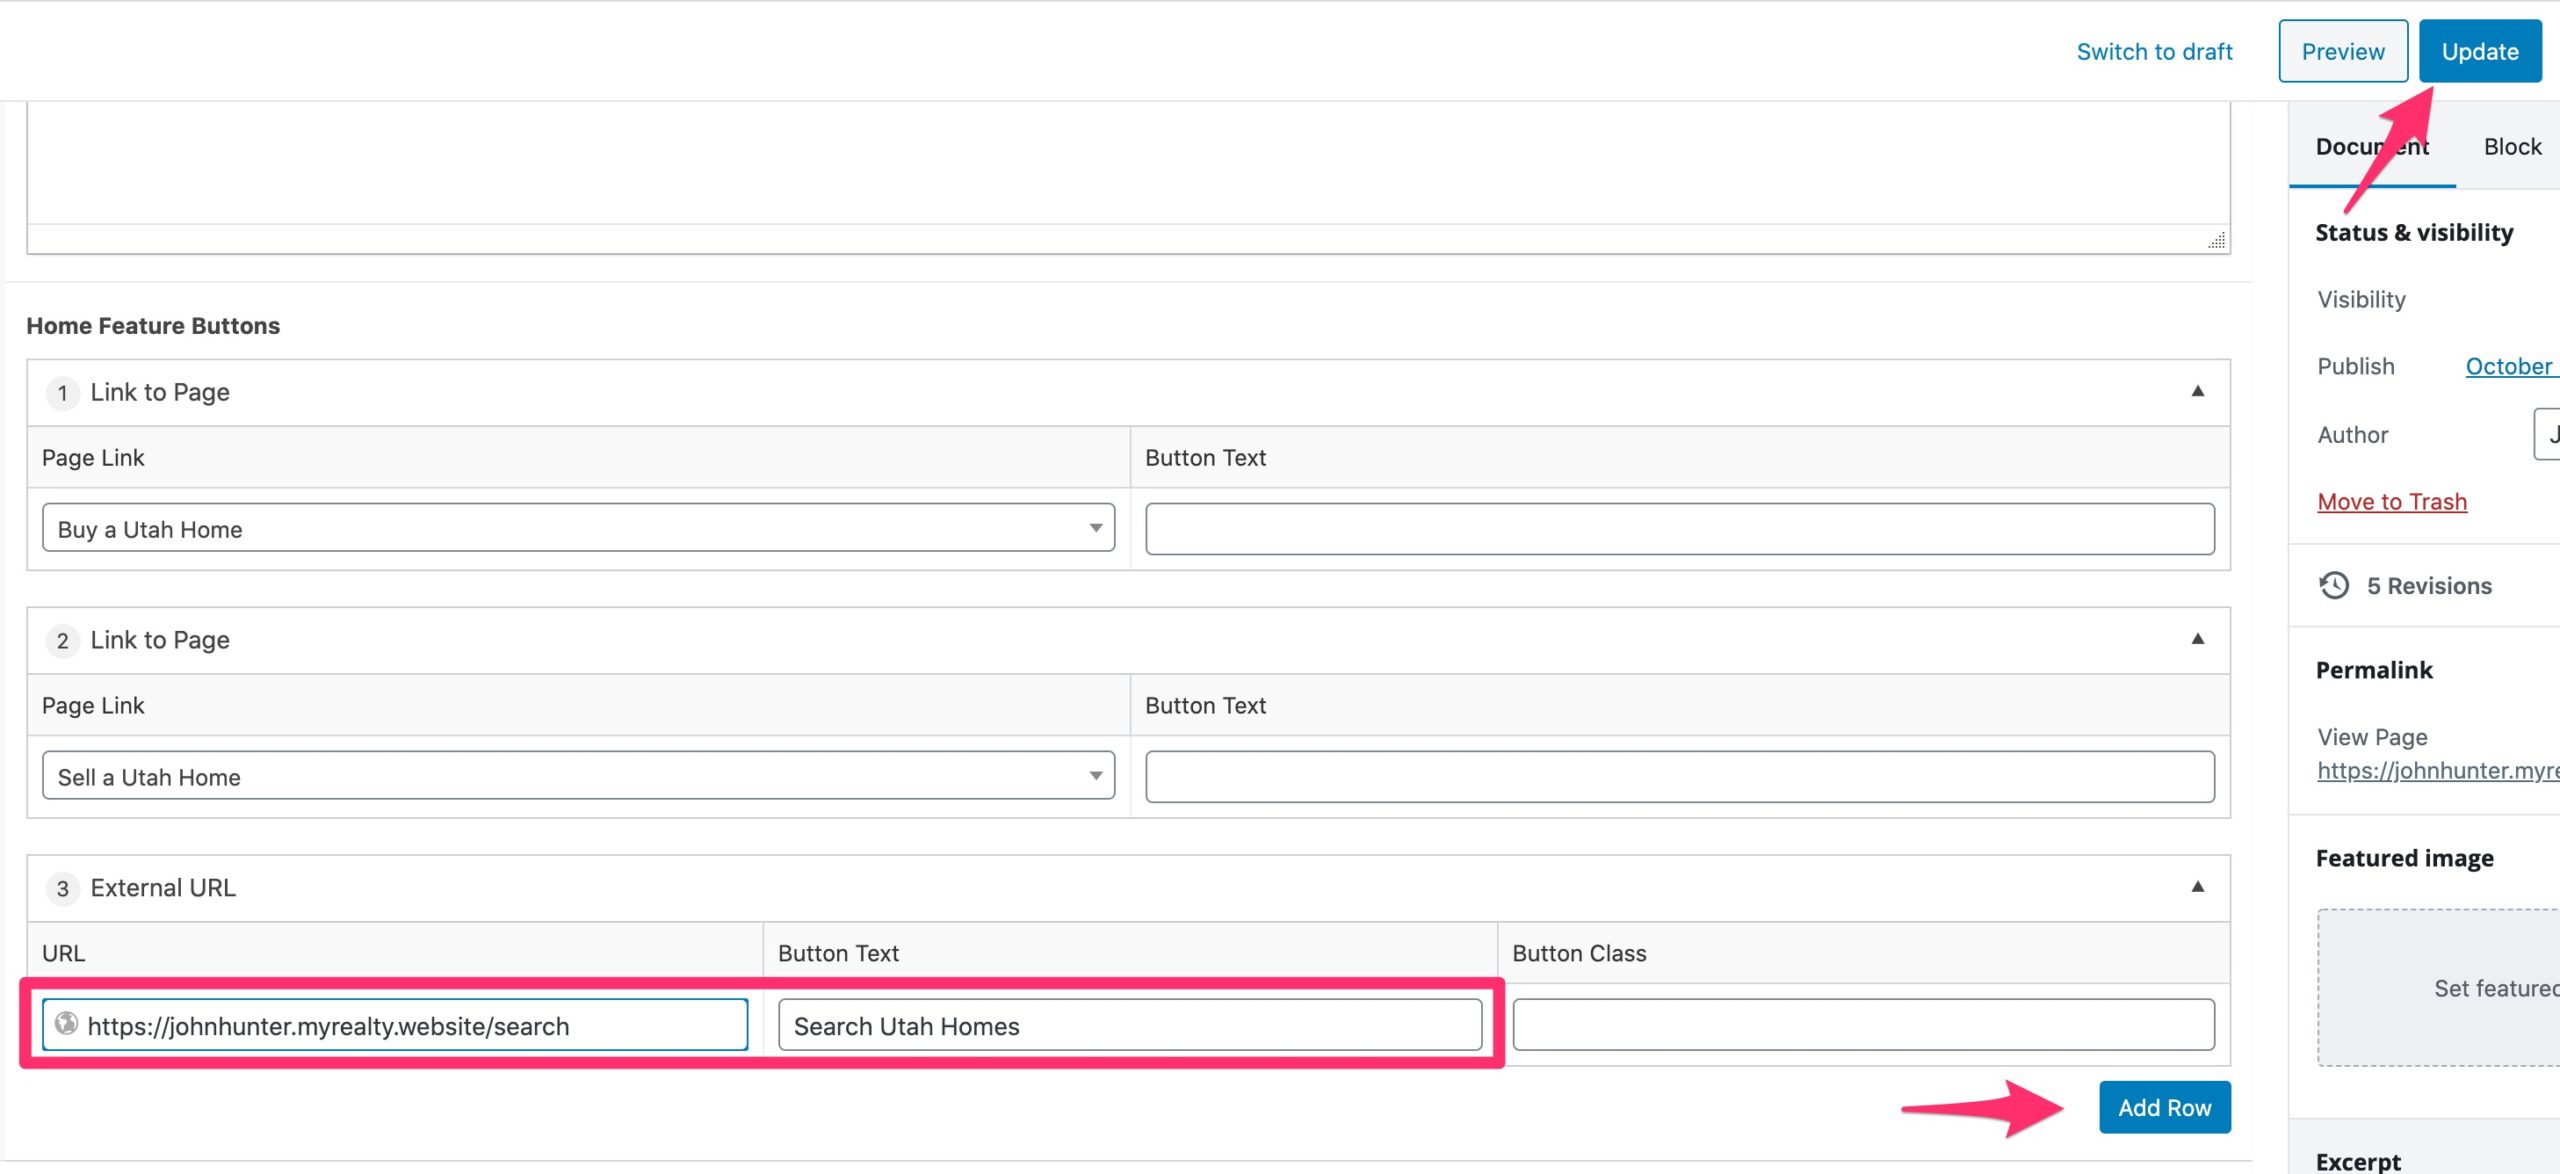
P) Go to the website’s homepage and click on “Edit Page” in the admin bar
Q) In the “Home Feature Buttons” section, click “Add Row” > “External URL”, enter the following information, and click “Update”
- URL: the client’s URL + “/search”
- Button Text: “Search [Market] Homes”